

So you’ve picked up a guitar and you’re ready to rock out like a pro, but every time you come across a chord diagram, you feel like you’re staring at hieroglyphics on a tomb wall. Fear not, fellow newbie guitarist! Chord diagrams may seem like intimidating puzzles at first, but once you crack the code, you’ll be strumming away like a champ in no time. So grab your guitar, dust off those befuddled brain cells, and let’s embark on a journey to decode the mysterious world of chord diagrams together!
Contents
- 1 Deciphering the Elements of a Chord Diagram
- 2 The Vertical Lines and Their Correlation to the Guitar Strings
- 3 Interpreting the Horizontal Frets on Chord Diagrams
- 4 Recognizing Finger Placement Indicators
- 5 Decoding Additional Symbols Found in Chord Diagrams
- 6 Practical Tips for Reading Chord Diagrams Accurately
- 7 Expanding Your Guitar Skills Beyond Basic Chord Diagrams
- 8 FAQs
- 9 Strum on, new guitarists!
Deciphering the Elements of a Chord Diagram
So, you want to be a chord diagram expert, huh? Well, grab your magnifying glass and Sherlock Holmes hat because we’re about to decipher the secrets of this musical mystery!
First things first, let’s talk about the elements you’ll find in a chord diagram. It’s like decoding a secret message, only it’s not actually a secret…it’s just music. Here’s what you need to know:
- Fingers: Those little guys that do all the work, pressing down on the strings to create beautiful music. Each finger is assigned a number to help you keep track of which one goes where.
- Strings: The lifelines of your guitar. These bad boys are numbered too, so you know which ones to pluck or strum. Make sure you’re hitting the right ones, or you might end up sounding like a cat being strangled.
- Dots: No, not those annoying little things that get all over your windshield. These dots represent where you should place your fingers on the strings. Connect the dots, and voila! You’ve got yourself a chord.
So, put on your detective hat and get ready to decode those chord diagrams like a pro. Who knows, maybe you’ll uncover the secret to becoming a rock star along the way!
 Guitar Strings”>
The Vertical Lines and Their Correlation to the Guitar Strings
Have you ever noticed how the vertical lines on a guitar fretboard seem to perfectly align with the strings? It’s almost as if there’s some sort of cosmic connection between the two. Well, the truth is, there is!
These vertical lines, also known as frets, are strategically placed along the neck of the guitar to help players easily navigate the different notes and chords. Each fret represents a different pitch, and when you press down on a string behind a fret, you change the length of the vibrating portion of the string, thus producing a different sound.
So, the next time you’re strumming away on your guitar, take a moment to appreciate the beauty of the vertical lines and their correlation to the strings. It’s like a dance between geometry and music, a harmonious symphony of shapes and sounds coming together to create something truly magical.
Remember, the next time you hit that sweet spot between a fret and a string, you’re not just playing music—you’re tapping into the very essence of the universe itself. Rock on, fellow guitarists!
Interpreting the Horizontal Frets on Chord Diagrams
So you’ve picked up your guitar, looked at a chord diagram, and now you’re feeling more lost than a cat in a kaleidoscope. Fear not, my fellow guitar enthusiasts! Let’s break down the mystery of those pesky horizontal frets and make sense of it all.
First things first, imagine the horizontal lines on the chord diagram as the strings on your guitar. Yes, those mystical bands of steel that send shivers down your spine when strummed just right. Each line represents a string, from the thinnest high E string to the beefy low E string.
Now, take a look at the numbers or dots that are scattered across those lines. These little devils are telling you which fret to press down on each string. It’s like playing a musical game of connect the dots, but instead of a cute bunny, you’re creating beautiful chords full of harmonic goodness.
Remember, the numbers or dots start from the left side of the diagram and move to the right. So, if you see a ‘3’ on the high E string and a ‘2’ on the B string, you best believe your fingers need to be on the third fret of the high E string and the second fret of the B string. It’s all about connecting the dots in the right order, like following the breadcrumbs to a delicious chord sandwich.

Recognizing Finger Placement Indicators
When it comes to finger placement indicators, it’s important to keep an eye out for these subtle signs that can make all the difference in your hand positioning:
- Feeling that familiar groove on your keyboard keys – ah, the sweet spot!
- Spotting those tiny worn-out areas on your guitar strings where your fingers have been doing all the work.
- Noticing the slight discoloration on your piano keys from hours of practice – a badge of honor!
These silent indicators may not seem like much, but they are key to mastering your instrument. So next time you’re playing, pay attention to these clues and let them guide your fingers to the perfect placement.
Remember, it’s all in the details - the way your fingers effortlessly glide over the keys, the way they instinctively find their place on the strings, the way they dance across the piano. These finger placement indicators are like little breadcrumbs leading you down the path to musical greatness.
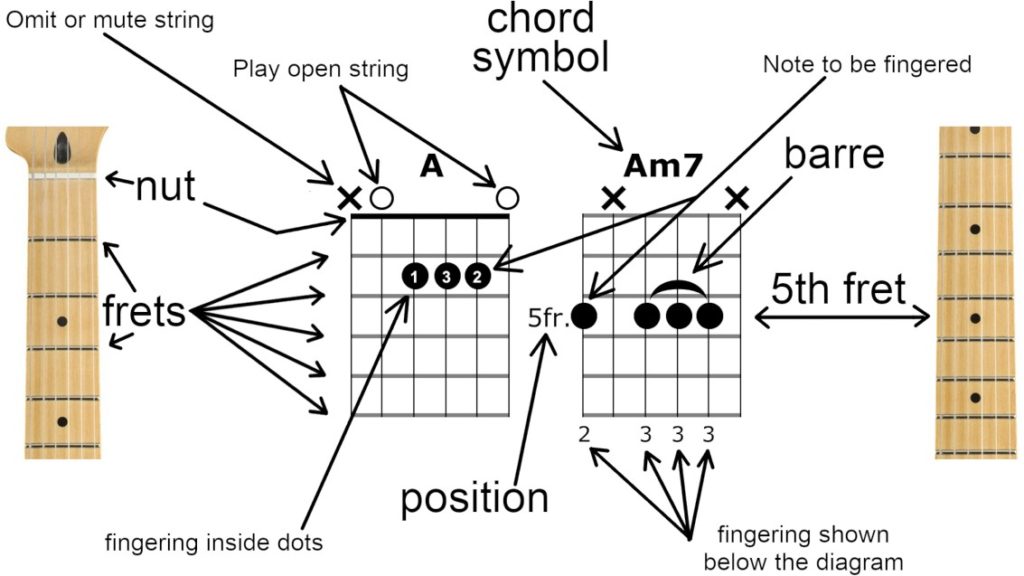
Decoding Additional Symbols Found in Chord Diagrams
Have you ever looked at a chord diagram and felt like you were staring at an ancient hieroglyphic inscription? Fear not, fellow musicians! We are here to help you unlock the secrets of those mysterious additional symbols that pop up in chord diagrams.
First up, let’s talk about those little “t”s and “o”s that seem to be scattered all over the place. No, they’re not just random doodles from a bored guitarist. The “t” symbol actually represents your thumb, reminding you to use it to mute the string indicated. Meanwhile, the “o” symbol signifies an open string, where you play the string without fretting it.
Next, we have those pesky numbers that show up above the strings. Don’t worry, they’re not trying to confuse you – well, maybe just a little. These numbers represent which fingers you should use to fret the corresponding notes. So, get those fingers in shape and start practicing your finger gymnastics!
Lastly, let’s address the mysterious “x” symbol that occasionally makes an appearance in chord diagrams. No, it’s not an algebra problem sneaking into your music sheet. The “x” symbol indicates that you should mute the string, either by lightly touching it with your finger or using some other fancy muting technique. Keep those strings quiet and rock on!
Practical Tips for Reading Chord Diagrams Accurately
So you’ve got your guitar in hand, ready to shred like a rockstar. But those pesky chord diagrams are throwing you for a loop! Fear not, dear reader, for I have some practical tips to help you navigate those tricky diagrams with ease.
First things first, pay attention to the orientation of the chord diagram. Is it upside down? Backwards? Sideways? Make sure you’re looking at it the right way, or you’ll end up playing some very interesting (read: incorrect) chords.
Next, take a closer look at those little dots on the diagram. Each dot represents a finger placement on the fretboard. It’s like a musical game of connect the dots! Make sure you’re placing your fingers on the correct strings and frets, or you’ll end up with a chord that sounds like a dying cat.
And finally, practice makes perfect. Don’t get discouraged if you can’t nail those chord changes right away. Keep at it, and soon enough you’ll be strumming along like a pro. Remember, Rome wasn’t built in a day, and neither was Jimi Hendrix’s guitar prowess.
Expanding Your Guitar Skills Beyond Basic Chord Diagrams
So you’ve mastered the basic chord diagrams on your guitar, but now you’re itching to take your skills to the next level. Fear not, brave guitarist! There are plenty of ways to expand your repertoire beyond those simple finger placements.
One great way to push yourself is to experiment with different chord inversions. Don’t be afraid to move those fingers around and see what unique sounds you can create. It may be a bit tricky at first, but once you get the hang of it, you’ll be amazed at the depth and richness it adds to your playing.
Another fun challenge is to explore alternate tunings. Drop D, open G, DADGAD – the possibilities are endless! Not only will this open up a whole new world of sonic possibilities, but it will also force you to think outside the box and approach your playing in a whole new way.
And of course, let’s not forget the importance of scales. Sure, they may not be as glamorous as chords, but mastering different scales can elevate your playing to a whole new level. Experiment with pentatonic, blues, and jazz scales to add a touch of sophistication to your solos.
FAQs
Why do guitarists need to understand chord diagrams?
Well, unless you plan on playing “Stairway to Heaven” entirely in power chords, you’re going to need to know how to play full chords. Chord diagrams are like the treasure map to unlocking the key to musical greatness (or at least jamming with your friends at a BBQ).
How do I read a chord diagram?
Think of chord diagrams as the IKEA instructions for your guitar playing journey. Each dot represents a finger placement on the fretboard, and the lines tell you which fret to place your meaty little digits on. It’s like connecting the dots, but with more musical talent involved.
What are some common symbols I’ll see in chord diagrams?
Oh, just your typical hieroglyphics for guitarists, like O’s for open strings, X’s for muted strings (shh, they’re sleeping), and numbers to indicate which finger to use. It’s like cracking a secret code, only the reward is a killer sound instead of buried treasure.
Why are some chords harder to play than others?
Well, if all chords were a walk in the park, everyone would be a guitar god. Some chords require finger acrobatics that not even the most flexible yogi could pull off. But fear not, with practice and determination, you’ll be shredding like a rockstar in no time.
How can I use chord diagrams to improve my guitar skills?
Consider chord diagrams your roadmap to guitar mastery. Start by learning a few basic chords, then start piecing them together like a musical jigsaw puzzle to play your favorite songs. Before you know it, you’ll be strumming and singing like a pro (or at least impressing your pet cat).
Strum on, new guitarists!
Congratulations on taking the first step towards mastering the art of chord diagrams! Remember, learning to play the guitar is a journey filled with highs and lows (literally and figuratively). But don’t fret (pun intended), with practice and patience, you’ll soon be strumming like a pro.
So keep practicing those chord diagrams, keep plucking those strings, and most importantly, keep rockin’ out on your guitar! And who knows, maybe one day you’ll be the one teaching others how to understand those elusive chord diagrams. Good luck and happy strumming!
