
Tuning up your guitar is like trying to achieve the perfect balance between a tightrope walker and a juggling clown. Sure, you want that sweet sound to hit just right, but you don’t want your fingers to feel like they’re going to fall off after playing two chords. How do you find that sweet spot between feather-light action and finger-breaking tension? It’s all about perfecting precision in the strategic adjustment of guitar action. Dive into the world of picking, strumming, and tweaking your way to guitar greatness in this guide to achieving the ultimate setup.
Contents
- 1 Understanding the Fundamentals of Guitar Action
- 2 Exploring the Critical Role of String Height in Guitar Playability
- 3 Step-by-Step Guide to Measuring and Adjusting Action
- 4 Choosing the Right Tools for Precision Guitar Setup
- 5 Navigating the Nuances of Truss Rod Adjustment
- 6 Balancing String Tension and Action for Optimal Performance
- 7 Addressing Common Problems and Solutions in Guitar Action Adjustment
- 8 FAQs
- 9 Rock On!
Understanding the Fundamentals of Guitar Action
Have you ever wondered why your fingers feel like they are getting a workout every time you try to play your guitar? Well, my friend, it all comes down to the guitar action. The height of the strings above the fretboard can make or break your playing experience. Let’s dive into the nitty-gritty details of this fundamental aspect of your beloved instrument.
First things first, let’s talk about how high or low your strings should be. A guitar with high action means that the strings are further away from the fretboard, making it harder to press them down. On the other hand, low action means the strings are closer to the fretboard, making it easier to fret a note. It’s all about finding that sweet spot that works best for your playing style.
Adjusting the action of your guitar involves tweaking the truss rod, saddle, and nut. It’s a delicate dance that can have a big impact on how your guitar feels and sounds. If you’re feeling adventurous, here are a few tips to help you get started:
- Use a capo to test different action heights without making permanent adjustments
- Invest in a good set of tools specifically designed for guitar setup
- Consult a professional if you’re not comfortable making adjustments yourself

Exploring the Critical Role of String Height in Guitar Playability
Ever tried playing a guitar that feels like the strings are a mile high off the fretboard? It’s enough to make you want to throw in the towel and pick up the kazoo instead. String height may seem like a trivial detail, but trust me, it can make or break your guitar playing experience.
Let’s break it down, shall we? Here are a few ways in which string height affects your guitar playability:
- Fretting Finger Fatigue: When the strings are too high, you’ll have to exert more force to press them down onto the frets. This can lead to some serious finger fatigue, not to mention blisters that make you feel like a wannabe rockstar.
- Buzz Kill: On the flip side, if the strings are too low, you’ll likely encounter some annoying fret buzz. It’s like your guitar is telling you, “Hey buddy, you’re playing too fast for your own good.”
So, the next time you pick up your trusty six-string companion, take a moment to appreciate the role that string height plays in your playability. And if you’re feeling adventurous, why not experiment with adjusting the string height yourself? Just remember, it’s all fun and games until you accidentally turn your guitar into a sitar.
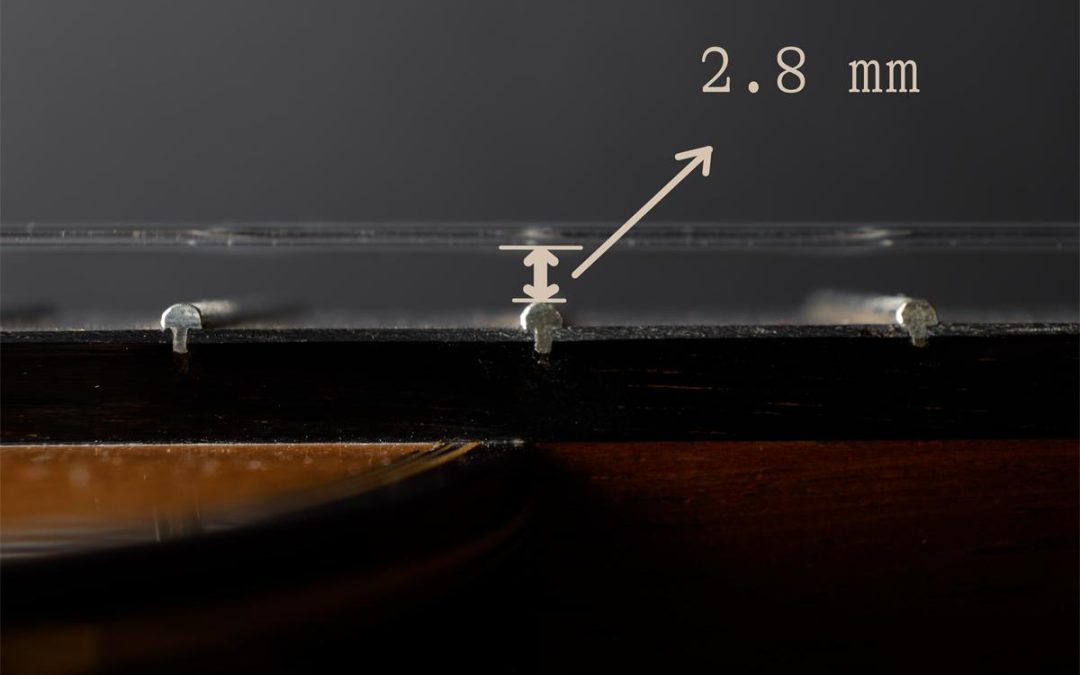
Step-by-Step Guide to Measuring and Adjusting Action
Alright folks, it’s time to dive into the wonderful world of measuring and adjusting action on your instrument! Grab your tools and let’s get started.
First things first, make sure you have a trusty ruler or feeler gauge handy. This will be your best friend as you navigate the treacherous waters of action adjustment. Remember, precision is key!
Next, loosen those strings a bit so you can get a good look at the bridge and nut. Don’t be afraid to get up close and personal with your instrument – it’s all in the name of finding that perfect action height.
Now, carefully measure the action height at the 12th fret using your ruler or feeler gauge. If it’s not quite where you want it to be, fear not! Simply adjust the bridge or nut height until you reach that sweet spot. And voila, your instrument is now perfectly set up for optimal playability. Happy strumming!

Choosing the Right Tools for Precision Guitar Setup
When it comes to dialing in the perfect guitar setup, having the right tools is essential. You wouldn’t try to assemble a piece of IKEA furniture with a butter knife, would you? So why skimp on the tools needed to get your guitar playing like a dream?
One of the most important tools for a precision guitar setup is a quality set of feelergauges. These handy little strips of metal come in varying thicknesses and are essential for setting the perfect string height and neck relief. Forget about using a credit card or random scraps of paper – invest in a good set of feelergauges and you’ll be amazed at the difference in playability.
Another crucial tool for a precision setup is a truss rod wrench. This little guy allows you to adjust the curvature of the neck, ensuring that your strings are running straight and true along the fretboard. Trying to use a pair of pliers or a random hex key will only lead to frustration and potentially damage your guitar – so do yourself a favor and get the right tool for the job.
And let’s not forget about nut files – the unsung heroes of the guitar setup world. These specialized files are designed to slot into the grooves of your guitar’s nut, allowing you to fine-tune the string spacing with precision. Trying to use a regular file or sandpaper will only result in a sloppy setup – so do yourself a favor and invest in a set of nut files that will have your guitar playing like a dream.

So, you’ve decided to dive into the world of truss rod adjustment. Congratulations, you brave soul! Just like trying to navigate a foreign country without knowing the language, adjusting a truss rod can be a daunting task for novices.
But fear not! With a little bit of guidance and a whole lot of trial and error, you’ll be on your way to truss rod adjustment mastery in no time. Here are a few tips to help you navigate the nuances of truss rod adjustment:
- **Less is more:** When it comes to adjusting your truss rod, remember that a little turn goes a long way. Just like when you’re trying to parallel park in a tight spot, patience is key.
- **Listen to your instrument:** Your guitar or bass will often give you clues as to whether it needs an adjustment. If you start noticing buzzing or a weird buzzing sound, it may be time to whip out that trusty Allen wrench.
- **Don’t be afraid to ask for help:** If you find yourself in over your head, don’t hesitate to seek out the wisdom of a more experienced player or luthier. They’ve been down this road before and can offer valuable insights.
So there you have it, aspiring truss rod adjustment aficionados. Remember, practice makes perfect, and one day you’ll look back on your truss rod woes with a chuckle. Happy adjusting!
Balancing String Tension and Action for Optimal Performance
When it comes to achieving optimal performance on your stringed instrument, finding the perfect balance between string tension and action is key. Too tight, and you’ll be fighting against your strings like they’re trying to strangle you. Too loose, and you might as well be playing a rubber band. So how do you strike that sweet spot?
First, consider your string tension. Think of it like Goldilocks and the Three Bears – not too tight, not too loose, but just right. Adjusting the tension can make a world of difference in how your instrument feels and sounds. Experiment with different gauges and brands until you find the one that makes your fingers dance with delight.
Next up, action. No, we’re not talking about the drama unfolding backstage at the concert hall – we mean the height of your strings above the fretboard. Too high, and you’ll need to press down with the strength of Hercules just to make a sound. Too low, and you’ll be buzzing like a bee on a caffeine high. Find that happy medium where your fingers can effortlessly glide across the strings like they’re dancing on air.
Remember, it’s all about finding that harmony between string tension and action – like a well-oiled machine where everything works in perfect sync. So grab your instrument, make some adjustments, and get ready to rock out like never before. Your fingers will thank you for it!
Addressing Common Problems and Solutions in Guitar Action Adjustment
Are you struggling with getting the perfect action on your guitar? Fear not, for we have some common problems and solutions to help you rock out like never before!
Problem 1: Buzzing strings. If you’re hearing a buzz when you play, it’s likely that your action is too low. Try raising the saddle or adjusting the truss rod to give your strings more room to vibrate without hitting the frets.
Problem 2: High action. On the other hand, if your action is too high, playing can feel like a real workout. Lower the saddle or tighten the truss rod to bring the strings closer to the fretboard for easier playing.
Solution: If you’re unsure about making adjustments yourself, consider taking your guitar to a professional for a setup. A trained luthier can help you achieve the perfect action for your playing style.
FAQs
Why is adjusting guitar action important?
Well, if you want your guitar to sound like a beautiful angel serenading you from the heavens, you better make sure that action is on point. Proper guitar action can prevent buzzing and improve playability, making your music sound like pure magic.
How do I know when my guitar action needs adjusting?
Is your guitar sounding more like a rusty old lawnmower than a harmonious symphony? Are your fingers crying out in pain every time you try to play a chord? If so, it might be time to give that action a little tune-up.
Can adjusting guitar action be done at home?
Of course, it can! All you need is a little bit of patience, some basic tools, and maybe a YouTube tutorial or two. Just remember, Rome wasn’t built in a day, and neither will your perfect guitar action.
What tools do I need to adjust guitar action?
You’ll need a trusty Allen wrench, a capo, and maybe a tuner to make sure you’re hitting all the right notes. Oh, and don’t forget a glass of water to keep you hydrated during this epic musical journey.
How often should I check and adjust my guitar action?
Just like how you wolf down a tub of ice cream after a breakup, you should check and adjust your guitar action whenever you feel like it’s not singing to you like it used to. It’s all about listening to your instrument and treating it with the love and care it deserves.
What are some common mistakes to avoid when adjusting guitar action?
Avoid going all Edward Scissorhands on your guitar strings and cutting them too short. Remember, a little trim here and there is all you need to make sweet music together. Also, don’t forget to check your tuning after making adjustments, or else you might end up sounding like a cat being strangled.
Rock On!
Thanks for tuning in to our tips and tricks on perfecting precision with the strategic adjustment of guitar action. Remember, a well-set-up guitar is a player’s best friend, and with a little patience and practice, you can achieve the perfect balance of playability and tone. So grab your tools, get tinkering, and rock on with your perfectly adjusted guitar!
