

So you’ve finally mastered the art of strumming and picking on your guitar, but those pesky chord changes still have you feeling like a beginner with two left hands. Don’t fret (pun intended), because we’re here to help you smooth out those transitions and make you a master of chord changes in no time. Grab your guitar and get ready to rock (or strum, whatever floats your boat), as we dive into the world of mastering smooth chord changes on the guitar. Let’s turn those clunky changes into smooth sailing, and leave your audience wondering how you manage to make it look so dang easy.
Contents
- 1 Understanding the Basics of Chord Transition Techniques
- 2 Developing Efficient Finger Placement and Movement
- 3 Strategies for Minimizing Hand Tension
- 4 Practicing Common Guitar Chord Progressions
- 5 Incorporating Rhythm into Your Chord Changes
- 6 Overcoming Challenges with Barre Chords and Stretch Chords
- 7 Advanced Exercises for Smooth and Rapid Chord Changes
- 8 FAQs
- 9 Happy Strumming!
Understanding the Basics of Chord Transition Techniques
So you’ve mastered playing a few chords on the guitar, but now you’re ready to take your skills to the next level with some fancy chord transition techniques. Well, buckle up buttercup, because we’re about to dive into the wild world of moving from one chord to another like a pro.
First things first, let’s talk about the importance of proper finger positioning. You can’t just slap your fingers anywhere on the fretboard and expect magic to happen. Take the time to really place your fingers in the correct positions for each chord. If you need to, use a cheat sheet to help guide you.
Next, it’s all about that smooth transition. You don’t want to sound like a drunken elephant stumbling through the jungle when you switch chords. Practice moving from one chord to the next slowly and deliberately until you can do it without even thinking. Trust me, your audience will thank you.
And lastly, don’t forget to have fun with it! Chord transitions can be frustrating at times, but remember, you’re not trying to impress Eric Clapton here (unless you are, in which case, good luck!). Just enjoy the process of learning and improving your skills. Before you know it, you’ll be rocking out like a true guitar god.

Developing Efficient Finger Placement and Movement
When it comes to playing an instrument or typing on a keyboard, having efficient finger placement and movement is key. Imagine trying to play a piano with your toes or typing on a computer with only your pinkies – it would be an absolute disaster!
To develop better finger placement, start by practicing scales or finger exercises regularly. This will help strengthen your fingers and improve dexterity. Remember, practice makes perfect!
Another tip is to pay attention to your hand positioning. Make sure your fingers are curved and hovering over the keys or frets – no lazy fingers allowed! Also, try not to tense up your hands too much, as this can lead to cramps and fatigue.
Lastly, don’t forget to take breaks and stretch your hands regularly. Give your poor fingers a well-deserved break from all that hard work. And remember, with dedication and practice, you’ll soon be a finger placement and movement pro!
Strategies for Minimizing Hand Tension
Are you tired of feeling like your hand is in a perpetual claw-like state from all the tension? Fear not! We have some strategies to help you minimize that hand tension and feel more relaxed.
First and foremost, make sure you are practicing good hand ergonomics. Keep your wrists straight and aligned with your forearms to prevent unnecessary strain. And remember, it’s all about the angles! Adjust your chair and desk height to ensure you have the proper posture while working.
Next, take frequent breaks to stretch those fingers and hands. Maybe throw in a little jazz hands action or give yourself a mini hand massage. Your hands work hard for you, so show them some love!
Lastly, consider using ergonomic tools such as a gel mouse pad or keyboard wrist rest to provide extra support for your hands. And don’t forget to **stay hydrated** - dehydration can lead to muscle tension, including in your hands. So drink up and give those hands a break!
Practicing Common Guitar Chord Progressions
So you’ve mastered the art of playing each individual chord on the guitar, but now it’s time to step up your game and practice some common chord progressions. These progressions are like the bread and butter of any guitarist’s repertoire, so get ready to impress your friends and family with your newfound skills!
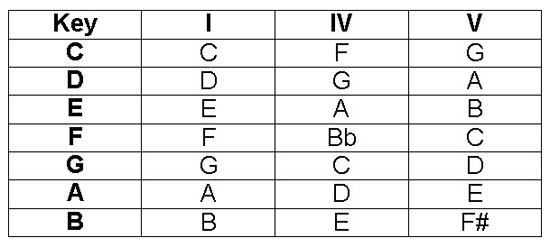
First up, we have the classic **I-IV-V** progression. This involves playing the 1st, 4th, and 5th chords in a key, creating a simple and catchy sequence that you’ll find in countless songs. Think of it as the musical equivalent of a ham and cheese sandwich – simple, satisfying, and always a crowd-pleaser!
Next, let’s try out the **vi-IV-I-V** progression. This sequence has a slightly more melancholic vibe, perfect for those introspective moments when you just want to strum away your feelings. It’s like a cozy blanket on a rainy day – comforting and familiar, yet with a hint of bittersweetness.
And finally, why not give the **ii-V-I** progression a whirl? Jazz musicians swear by this combination, as it adds a jazzy flair to your playing and creates a sense of resolution that is oh-so-satisfying. It’s like sipping a fancy cocktail at a swanky bar – smooth, sophisticated, and guaranteed to make you feel like a musical genius!
Incorporating Rhythm into Your Chord Changes
Have you ever felt like your chord changes are missing that certain je ne sais quoi? Well, fear not, dear musician! The secret to taking your chord progressions to the next level lies in incorporating rhythm into your playing.
One way to spice up your chord changes is by using syncopation. This means playing your chords off the beat, giving them a funky feel that will have your listeners tapping their feet in no time. Experiment with placing your chords on the “and” of each beat for a lively, unpredictable sound.
Another fun technique to try is adding in some rhythmic embellishments to your chords. Mix things up by throwing in some staccato strums or palm-muted notes to create variety and interest in your playing. Remember, music is all about texture and dynamics, so don’t be afraid to get creative!
And last but certainly not least, don’t forget about the power of silence. Use rests strategically between your chord changes to create tension and build anticipation. A well-placed pause can elevate a simple progression into something truly memorable. So go ahead, unleash your inner rhythm master and watch your chord changes come to life!
Overcoming Challenges with Barre Chords and Stretch Chords
So you’ve finally decided to tackle those pesky barre chords and stretch chords on your guitar. Congratulations! You’re about to embark on a tumultuous journey filled with frustration, hand cramps, and the occasional existential crisis. But fear not, brave warrior, for I am here to guide you through the treacherous waters of fretboard tyranny.
First things first, let’s address the elephant in the room – barre chords. Ah yes, the bane of every guitarist’s existence. The key to mastering barre chords is proper finger placement and a touch of masochism. Remember to press down firmly with your index finger while simultaneously contorting your hand into an unnatural claw-like shape. Embrace the pain, my friend, for it is the path to victory.
Now, onto the elusive stretch chords. These sneaky little devils require fingers of a contortionist and the patience of a saint. Imagine trying to tie your shoelaces with sausage fingers – that’s the level of dexterity we’re aiming for here. Practice stretching your fingers across multiple frets until they feel like they might snap off. It’s all part of the fun!
Remember, Rome wasn’t built in a day, and neither will your guitar skills be. Take breaks when needed, stretch those fingers, and above all, don’t be afraid to laugh at yourself. After all, what’s a little hand cramp between friends?
Advanced Exercises for Smooth and Rapid Chord Changes
So, you’ve mastered the basic chords and now you’re ready to take your guitar playing to the next level with some . Get ready to impress your friends with your lightning-fast fingers!
First up, let’s work on some finger independence exercises. Practice moving each finger independently to different frets on the neck. This will help you develop the dexterity needed to switch chords quickly and seamlessly. Try playing scales and arpeggios using only one finger at a time – it may feel awkward at first, but it will pay off in the long run!
Next, try incorporating barre chords into your practice routine. Barre chords require you to use one finger to hold down multiple strings, which can be challenging at first. Start by practicing basic barre chord shapes and then try incorporating them into chord progressions. Before you know it, you’ll be switching between barre chords with ease!
Finally, don’t forget to practice chord transitions in the context of actual songs. Choose a few songs with tricky chord changes and focus on smoothing out the transitions between chords. You’ll not only improve your chord-changing skills, but you’ll also be expanding your repertoire at the same time. And remember, practice makes perfect!
FAQs
How can I make my chord changes on guitar smoother?
Practice, practice, practice! Start by playing the individual chords slowly and make sure each note is ringing out clearly. Then, gradually increase your speed until you can switch between chords seamlessly.
Is there a specific technique I should use to improve my chord changes?
Yes, one helpful technique is to practice transitioning between chord pairs that commonly appear together in songs. By focusing on these specific changes, you can improve your muscle memory and make switching between chords more natural.
What should I do if I keep getting stuck on a particular chord change?
Try isolating the challenging transition and practicing it on its own. Break the change down into smaller, more manageable parts and work on each element until you feel comfortable putting it all together.
Are there any exercises or drills I can do to work on my chord changes?
One effective exercise is to set a metronome to a slow tempo and practice transitioning between two chords on each beat. As you get more comfortable, you can gradually increase the speed of the metronome to challenge yourself even further.
How long does it typically take to master smooth chord changes on guitar?
The time it takes to master chord changes varies from person to person, but with consistent practice and dedication, you can see improvements in a matter of weeks or months. Remember, everyone progresses at their own pace, so be patient with yourself.
Happy Strumming!
Thank you for diving into the world of mastering smooth chord changes on guitar. Remember, practice makes perfect, so don’t be afraid to strum away until your fingers become one with the strings. Keep those chord changes crisp and clean, and soon enough you’ll be playing like a rockstar. So keep on jamming, and don’t forget to have fun along the way!
