
Frustrated with your guitar constantly going out of tune or feeling uncomfortable to play? It’s time to take matters into your own hands and master the art of guitar setup for perfect playability. So grab your tools, put on your DIY hat, and get ready to unleash your inner guitar whisperer. It’s time to bring out the best in your beloved six-string companion and rock out with confidence.
Contents
- 1 Understanding Guitar Anatomy and Its Impact on Playability
- 2 Selecting the Right Tools for the Job
- 3 Truss Rod Adjustment for Optimal Neck Relief
- 4 Setting String Action for Comfort and Accuracy
- 5 Intonation Adjustments for Harmonic Precision
- 6 Nut and Saddle Adjustments for Improved Tone
- 7 Mastering Pickup Height for Balanced Output and Tone Control
- 8 FAQs
- 9 Rock on, Guitar Hero!
Understanding Guitar Anatomy and Its Impact on Playability
So, you’ve picked up the guitar and you’re ready to rock out like a pro. But before you can shred like Hendrix, it’s important to understand the inner workings of your trusty six-stringed sidekick.
Let’s start with the basics. The guitar is made up of several key components that impact its playability:
- Neck: This long, slender piece connects the body of the guitar to the headstock. It’s where all the magic happens, so make sure it’s comfortable in your hands.
- Fretboard: The flat, wooden surface where you press down to create different notes. Keep it clean and well-maintained for smooth playing.
- Body: The big, curvy part of the guitar where the sound is produced. Choose a shape and size that suits your style – after all, you want to look good while you jam.
Now, let’s talk about how these components impact your playability. A well-crafted guitar with a smooth neck and fretboard will make it easier to slide between chords and rip through solos. On the other hand, a poorly constructed guitar might make you feel like you’re playing a rusty old tin can.

Selecting the Right Tools for the Job
When it comes to , it’s important to choose wisely. You wouldn’t try to cut down a tree with a butter knife, would you? Of course not! So, make sure you have the proper tools at your disposal before tackling any project.
One of the keys to success is having a diverse toolkit. You wouldn’t wear the same outfit every day, so why use the same tool for every task? Mix it up and add some variety to your toolbox. You never know when that random tool you bought on a whim will come in handy!
Don’t be afraid to think outside the box when selecting tools. Sometimes the most unconventional tool ends up being the most useful. Need to screw something in but can’t find a screwdriver? Use a coin or a butter knife! Just be careful not to strip the screw…or butter.
Remember, the right tools can make all the difference in the success of a project. So, take the time to evaluate your options and choose wisely. Your future self will thank you for it!

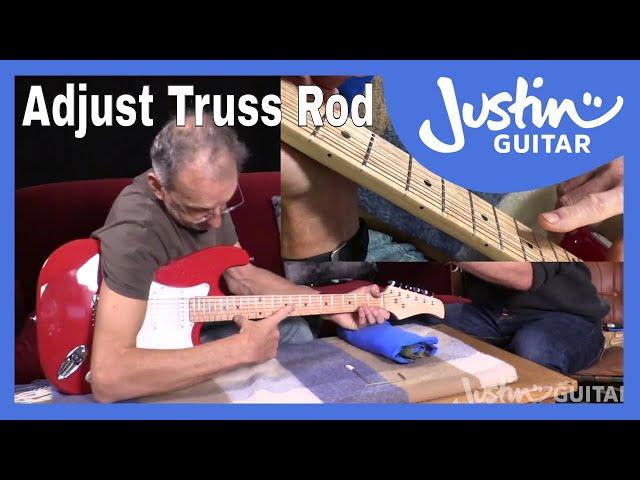
Truss Rod Adjustment for Optimal Neck Relief
So you’ve got your hands on a guitar with a wonky neck, huh? Fear not, dear player, for I am here to guide you through the mystical art of truss rod adjustment. This magical rod hidden within your guitar’s neck holds the power to straighten out any curves or bends that may be hindering your playing experience.
First things first, grab yourself a trusty allen wrench (also known as a hex key) and locate the truss rod adjustment nut. It’s usually hiding behind a little cover at the headstock of your guitar. Once you’ve uncovered this elusive nut, give it a gentle turn to the right to tighten or to the left to loosen. Remember, a little goes a long way in the world of truss rod adjustment.
Now, it’s time to strike that perfect balance between a straight neck and optimal relief. Play around with the truss rod until you find that sweet spot where your strings are just kissing the frets but not choking them out. Be patient, my friend, for this may take a bit of trial and error.
And there you have it! With a little bit of elbow grease and a whole lot of determination, you’ve successfully mastered the art of truss rod adjustment. Your guitar’s neck is now primed and ready for some serious shredding. Now go forth, brave player, and conquer that fretboard like never before!

Setting String Action for Comfort and Accuracy
So you’ve finally decided to tackle the beast that is setting string action on your guitar. Bravo, my friend. But fear not, for I am here to guide you through this treacherous task with wit and wisdom.
First things first, grab your trusty Allen wrench (or hex key for you fancy folks) and get ready to dive into the world of action adjustment. Remember, a perfectly set string action can make all the difference in your playing experience.
Now, let’s talk numbers. When adjusting your string height, keep in mind that the optimal action is typically around 3/32 of an inch on the high E string and 7/64 of an inch on the low E string. But hey, who’s got time for measuring? Just eyeball it and call it a day, am I right?
Once you’ve got that action dialed in, take a moment to marvel at your handiwork. Your fingers will thank you for the added comfort and your guitar will be singing with accuracy. And hey, if all else fails, just blame it on the weather. Works every time.
Intonation Adjustments for Harmonic Precision
Ever find yourself struggling to hit those high notes with perfect precision? Fear not, for we have the solution to all your intonation woes! By making a few simple adjustments to your harmonics, you’ll be singing like a bird in no time.
One key tip for achieving harmonic precision is to pay close attention to your breathing. Take deep breaths before each note to ensure you have enough air to hit those highs and lows with ease. Another helpful trick is to imagine yourself as a human tuning fork, vibrating in perfect harmony with the music.
Remember, practice makes perfect when it comes to intonation adjustments. Don’t be afraid to experiment with different vocal techniques and styles to find what works best for you. And most importantly, have fun with it! Singing should be a joyful experience, so don’t stress too much about hitting every note perfectly.
So go ahead, give these intonation adjustments a try and watch as your harmonics reach new levels of precision. Who knows, you may just discover a whole new range of vocal abilities you never knew you had!
Nut and Saddle Adjustments for Improved Tone
So you’ve got your trusty guitar in hand, ready to rock out and impress your friends with your amazing skills. But wait, before you start shredding, have you ever considered the importance of ?
These seemingly small components play a crucial role in the sound of your guitar. By making a few tweaks here and there, you can take your playing to a whole new level. So grab your tools and let’s get started!
First things first, **check the height** of your nut and saddle. If they’re too high, your strings will be harder to press down, affecting both playability and tone. Make sure they’re at the optimal height for smoother playing and better sound.
Next, **check for any wear and tear** on the nut and saddle. If they’re looking a bit worse for wear, it might be time for a replacement. Fresh components can make a world of difference in how your guitar sounds.
Mastering Pickup Height for Balanced Output and Tone Control
So you want to take your guitar game to the next level, huh? Well, buckle up because we’re about to dive deep into the world of pickup height adjustment. It may sound like a boring task, but trust me, getting your pickups just right can make all the difference in your tone!
First things first, you need to understand that adjusting pickup height is like a delicate dance between output and tone control. Get it wrong, and you might end up with a muddy mess of sound. But fear not, with a little trial and error (and maybe a few curse words), you’ll be on your way to sonic perfection. Here are some tips to help you master the art of pickup height:
- Start by setting your pickups at the manufacturer’s recommended height. This will give you a good baseline to work from.
- Adjust the height of the pickups one at a time, starting with the neck pickup. Use a ruler or feeler gauge to ensure your measurements are accurate.
- Experiment with different heights to find the sweet spot where you get the perfect balance of output and clarity. Trust me, when you hit that sweet spot, you’ll know!
Remember, there’s no one-size-fits-all approach to pickup height adjustment. It’s all about finding what works best for your playing style and tone preferences. So get out there, grab your screwdriver, and start tinkering – your ears will thank you!
FAQs
Why is guitar setup important?
Well, imagine trying to drive a car with flat tires and the steering wheel all wonky. You wouldn’t get very far, would you? The same goes for a guitar – if it’s not set up properly, it’s going to be a nightmare to play. So, in short, a good guitar setup is the key to perfect playability.
What are some signs that my guitar needs a setup?
If your strings are too high off the fretboard, your intonation is off, or your guitar just doesn’t feel right when you’re playing it, it’s probably time for a setup. You wouldn’t try to run a marathon in flip flops, would you? No, you’d get some proper running shoes. Same goes for your guitar.
Can I do a setup on my own?
Well, you can try, but unless you’re a seasoned guitar tech, you might end up doing more harm than good. It’s kind of like trying to perform open heart surgery after watching a couple of episodes of Grey’s Anatomy. Trust me, leave it to the professionals.
How often should I get my guitar set up?
It really depends on how much you play and how well you take care of your guitar. If you’re playing gigs every weekend, you might want to get a setup a few times a year. If you’re just strumming a few chords in your bedroom, once a year should do the trick. Just listen to your guitar – it’ll tell you when it needs some TLC.
Rock on, Guitar Hero!
Whether you’re a seasoned pro or just starting out on your musical journey, mastering the art of guitar setup is essential for achieving that perfect playability. So go ahead, tweak those strings, adjust that truss rod, and fine-tune that action until your guitar is singing like a dream. With a little patience and a whole lot of rock ‘n’ roll spirit, you’ll be shredding like a true guitar virtuoso in no time. Keep strumming, keep jamming, and most importantly, keep rocking on!
