
Are you tired of feeling like a musical novice when it comes to chord diagrams? Do you find yourself strumming along, only to hit a sour note and ruin the entire song? Well, fear not, because we’ve got the ultimate guide to help you become a chord diagram master! Get ready to conquer those frets and dazzle your friends with your newfound skills. So grab your guitar and get ready to rock (and roll your fingers across those strings)!
Contents
- 1 Understanding the Basics of Chord Diagrams
- 2 Exploring the Components of a Chord Diagram
- 3 Moving Beyond the Basics: Advanced Chord Diagram Techniques
- 4 Applying Chord Diagrams to Different Musical Instruments
- 5 Tips and Tricks for Quick Mastery of Chord Diagrams
- 6 Navigating Common Challenges in Reading Chord Diagrams
- 7 Resources for Further Learning and Practice with Chord Diagrams
- 8 FAQs
- 9 In conclusion, remember to hit all the right notes!
Understanding the Basics of Chord Diagrams
Have you ever looked at a chord diagram and felt completely lost? Like trying to solve a Rubik’s cube blindfolded while riding a unicycle? Fear not, my confused compadres, for I am here to guide you through the treacherous waters of chord diagrams with the grace and finesse of a swan ice skating on a frozen lake.
First things first, let’s break it down Barney style. A chord diagram is essentially a visual representation of a fretboard, designed to show you where to place your fingers to play a specific chord. It’s like a cheat code for your guitar-playing adventures, a secret map leading you to the musical treasure chest known as harmony.
Now, imagine the fretboard as a battlefield, with each fret and string an enemy soldier waiting to be conquered. Your fingers are the fearless warriors, tasked with vanquishing the foe and claiming victory in the name of rock ‘n’ roll. The chord diagram is your battle plan, your blueprint for success in the sonic arena.
So take heed, brave minstrels of the six-string persuasion, and arm yourselves with the knowledge of chord diagrams. With a little practice and a touch of wizardry, you’ll soon be wielding your axe like a true guitar hero, shredding your way to glory and enchanting audiences with your musical sorcery. Now go forth and conquer, my friends. The fretboard awaits!
Exploring the Components of a Chord Diagram
So you want to explore the magical world of chord diagrams, huh? Well grab your magnifying glass and Sherlock Holmes hat, because we’re diving deep into the components of this musical puzzle!
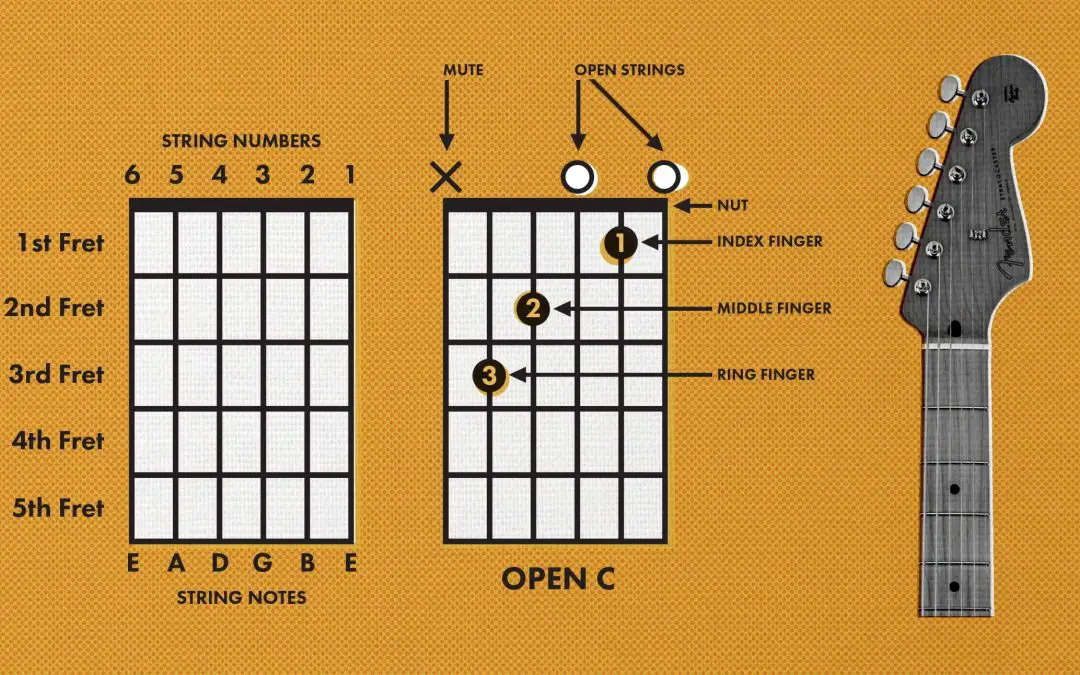
First up, we have the circles. These little guys are the bread and butter of a chord diagram. Each circle represents a different finger position on the guitar fretboard. Think of them as your trusty sidekicks, guiding you through the maze of notes and chords.
Next, we have the lines. These sneaky lines connect the circles, showing you how to move from one finger position to the next. It’s like a musical connect-the-dots, but with more jam sessions and less crayons.
And last but not least, we have the numbers. These mysterious symbols inside the circles tell you which fret to press down on and which finger to use. It’s like cracking the code to a secret musical language – but don’t worry, we won’t tell anyone if you need a cheat sheet!

Moving Beyond the Basics: Advanced Chord Diagram Techniques
So you’ve mastered the basics of chord diagrams and you’re ready to take your skills to the next level. Congratulations, you’re officially a chord diagram wizard! But why stop there when you can become a chord diagram sorcerer? Here are some advanced techniques to help you wield your chord diagram powers like a true master:
- Custom Shapes: Who says chord diagrams have to be boring circles? Break free from the traditional shape and create custom shapes for your diagrams. Why not try a star, a heart, or even a unicorn? The sky’s the limit (literally, you can even do a rocket ship diagram)!
- Interactive Diagrams: Want to take your chord diagrams to the next level? Make them interactive! Add hover effects to highlight different chords, or even create a clickable diagram where users can play along with the song. It’s like Guitar Hero, but with actual chords!
- Multiple Layers: Why settle for one layer of chords when you can have multiple layers? Create complex diagrams with different layers for verses, choruses, bridges, and solos. Just make sure you don’t get lost in all those layers – it’s like a musical onion, but without the tears.

Applying Chord Diagrams to Different Musical Instruments
Are you tired of only using chord diagrams for your guitar playing? Well, fear not, my musically adventurous friends! Chord diagrams can be applied to a variety of different instruments to spice up your playing and impress your fellow musicians.
First up, let’s talk about applying chord diagrams to the ukulele. With its small size and four strings, the ukulele is the perfect instrument to experiment with chord diagrams. Simply transfer the finger placements from your guitar chord diagrams to the ukulele and voila! You’ll be strumming away like a pro in no time.
Next on our list is the piano. Yes, you read that right – chord diagrams can be used on the piano too! Simply assign each finger a string from your guitar chord diagram and play them all at once for a beautifully harmonious sound. Who knew the piano could be so versatile?
And last but not least, let’s not forget about the humble banjo. With its unique sound and Appalachian roots, the banjo is the perfect instrument to experiment with chord diagrams. Simply pluck away at those strings using the finger placements from your guitar chord diagrams, and watch as your banjo playing reaches a whole new level of awesomeness.
So there you have it, folks. The possibilities are endless when it comes to . So go ahead, grab your instrument of choice, and get ready to rock out in a whole new way!
Tips and Tricks for Quick Mastery of Chord Diagrams
So you’ve picked up the guitar and now you’re ready to conquer those pesky chord diagrams. Well, fear not my fellow music enthusiast! I’ve got some tips and tricks up my sleeve that will have you mastering those chords in no time.
First things first, practice makes perfect. Spend some time each day familiarizing yourself with the different chord shapes. Just like riding a bike or perfecting your pancake flipping skills, it takes time and dedication.
Next, don’t be afraid to get a little creative with how you approach learning chord diagrams. Use mnemonic devices to remember the finger positions or come up with silly rhymes to help you memorize the shapes. Who said learning music couldn’t be fun?
And finally, when all else fails, just remember the wise words of Yoda: “Do or do not, there is no try.” Channel your inner Jedi mastery and keep at it until those chord diagrams bow down to your rockstar prowess. May the chords be with you!
Have you ever looked at a chord diagram and felt like you were trying to solve a Rubik’s Cube blindfolded? Fear not, fellow musicians! We’ve all been there. Navigating the treacherous waters of chord diagrams can be tricky, but with a little practice and a lot of patience, you can conquer this musical obstacle like a true champion.
One common challenge in reading chord diagrams is deciphering which strings correspond to which lines. It’s like trying to crack a secret code, but with a little je ne sais quoi, you’ll be able to master this skill in no time. Remember: the thinnest string is the top line (the one closest to your head when holding the guitar), and the thickest string is the bottom line (the one closest to the ground).
Another hurdle to overcome is figuring out where to place your fingers on the frets. It’s like playing a game of Twister with your digits, but don’t worry – practice makes perfect! Start by memorizing the names of the frets (1-5 on the top line, 6-9 on the middle line, and 10-14 on the bottom line) and then use your magical fingers to press down on the corresponding strings.
Lastly, don’t forget to strum that guitar like you mean it! Embrace the rhythm, feel the music in your bones, and let your inner rockstar shine through. With a little determination and a lot of caffeine, you’ll be reading chord diagrams like a pro in no time. So go forth, brave musician, and conquer those chord diagrams with all the gusto of a lion devouring its prey – metaphorically speaking, of course.
Resources for Further Learning and Practice with Chord Diagrams
Need some extra help mastering those pesky chord diagrams? Look no further! We’ve compiled a list of resources that will have you strumming like a pro in no time.
Check out these websites for tutorials, exercises, and tips on chord diagrams:
- ChordMaster – This site offers interactive lessons on all things chord-related. Get ready to flex those finger muscles!
- ChordWizard – Learn the secrets to deciphering chord diagrams with this handy resource. Soon you’ll be playing chords you never thought possible!
If online resources aren’t your thing, fear not! Grab a book or two to help deepen your understanding of chord diagrams:
- Chordology 101 by Professor Whammy – This witty guide breaks down chord diagrams in a way that even a tone-deaf hedgehog could understand.
- Jammin’ Jam Sessions by Sir Strum-a-Lot – Unleash your inner rockstar with this collection of chord diagram exercises and practice tracks. Your neighbors won’t know what hit them!
So go forth, intrepid chord explorer! With these resources at your disposal, you’ll be ruling the fretboard in no time. Happy strumming!
FAQs
Can you tell me what a chord diagram is?
Absolutely! A chord diagram is like a little map that shows you where to place your fingers on the guitar to play a specific chord. It’s like your own personal GPS for navigating the fretboard.
Why are chord diagrams important to learn?
Well, imagine trying to navigate a foreign city without a map. That’s what playing guitar without chord diagrams is like. They make it way easier to learn new chords and songs, and they help you sound like a rockstar in no time.
How do I read a chord diagram?
Think of a chord diagram like a snapshot of your guitar neck. The vertical lines represent the strings, and the horizontal lines represent the frets. The dots tell you where to place your fingers to play the chord. It’s like connect the dots, but way more musical.
What’s the best way to practice using chord diagrams?
Take it slow and steady, like a tortoise in a race. Start by learning one chord at a time and then practice transitioning between chords. Soon enough, you’ll be able to play your favorite songs like a pro.
Any tips for mastering chord diagrams?
Practice makes perfect, but a little cheat sheet never hurt anyone. Keep a chord diagram handy while you’re practicing, and don’t be afraid to experiment with different fingerings to find what works best for you. And remember, Rome wasn’t built in a day, so be patient with yourself.
In conclusion, remember to hit all the right notes!
After reading this comprehensive guide on mastering chord diagrams, you are well on your way to becoming a master musician. Whether you’re a guitar hero or just strumming along for fun, understanding chord diagrams is key to playing your favorite tunes with confidence. So grab your instrument, start practicing, and before you know it, you’ll be rocking out like a pro. Keep on strumming and remember – practice makes perfect!
