
Contents
- 1 Best Way To Learn To Play A Guitar
- 2 In This Free Guide You Will Learn The Following:
- 3 Learning The Parts Of The Guitar
- 4 Electric Guitar Parts:
- 5 How To Correctly Hold A Guitar
- 6 The Guitar Strings And The Names Of Them
- 7 3 WaysTo Tune Your Guitar
- 8 Learn How To Hold A Guitar Pick
- 9 Fretting Hand
- 10 How To Read Guitar Tablature
- 11 How To Read A Chord Chart
- 12 Basic Guitar Chords
- 13 Download Basic Chords Here
- 14 Basic Major Scale in A
- 15 Basic Minor Scale in A
- 16 Setting up a Practice Routine, and why you should!
- 17 Practice Routine:
- 18 Warm Up Exercises
- 19 Guitar Warm Up Exercises
- 20 Chords and Changing between them
- 21 Practicing the Major/Minor Scale
- 22 Frequently Asked Questions
- 23 In Conclusion:
Best Way To Learn To Play A Guitar
I remember the excitement of getting my very first guitar at the age of 9. I was absolutely in awe of it. Even though at the time I didn’t even know how to hold it properly.
I’m excited to teach you how to play the guitar-
In This Free Guide You Will Learn The Following:
- Learn the parts of the guitar
- How to properly hold the guitar
- The guitar strings and the names of them
- How to tune your guitar and the best tuners or apps to use.
- How to hold a guitar pick correctly
- Fretting hand, understanding the frets, and proper hand placement
- How to read tablature
- How to read a chord chart
- Learn basic guitar chords
- Learn the major and minor scale
- Learn how to set up an effective practice routine ( Even if you have limited time!
- FAQ’s on learning how to play a guitar
Ready to learn how to play a guitar? Let’s dive in!
Learning The Parts Of The Guitar
Before we get into playing the guitar. It is wise to familiarize yourself with the parts of it. Now this will be different depending on if you are playing an electric or an acoustic.
We will discuss the parts of both styles of guitars.
Electric Guitar Parts:
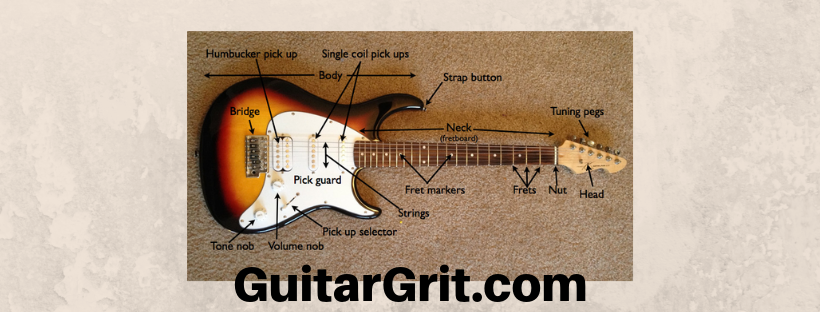
First let’s take a quick look at an image of an electric guitar, and review the parts of it.
Tuning pegs – These are used to keep the guitar in tune. The peg is turned either counter clockwise to tighten the string, or clockwise to loosen the string.
This in return will change the pitch of the string. If you over tighten the string will go sharp, if you loosen the string too much the string will be flat. ( We will discuss tuners, and guitar tuning apps later in the guide).
Headstock – The headstock is the top of the guitar. This is attached to the tuning pegs, as well as the neck of the guitar.
The Nut – The nut on a guitar is the first horizontal piece that attaches the headstock to the neck of the guitar. The nut has 6 grooves that the strings will fit into and run down to the bridge of the guitar which is fastened to the guitars body.
The frets – Frets are the metal horizontal lines that move down the guitar neck. When you are playing you want to put your finger right at the front of the fret. This is not to be mistaken for your fingers being placed directly on top of the fret.
The Neck – The neck of the guitar is the long piece of wood that is flat on the fretting side and rounded on the backside where you will place your thumb.
Strap button – The strap buttons are simply just as the name describes. There is one at the top of the body of the guitar, and one at the backend of the guitar. Your guitar strap, will strap onto the buttons. This will allow for you to play guitar while standing.
Pickups – The pickups on the guitar can be many different styles.
A few common types are called single coil pickups. These can be described best here.
Some guitars also have what are called humbucker pickups. These pickups are great for Rock music and cut down on the feedback noise, once plugged into an amplifier.
Pickup selector – The pickup selector has multiple positions, so that you can choose which pickup is being activated, and which pickup is being bypassed.
The Pickguard – The pickguard is a plastic guard that is placed around where you will strum. This guard simply protects the body of the guitar from being scratched while strumming.
The body – The body of the guitar is the wooden piece that is attached to the neck of the guitar. The body holds the guitar pickups, and the bridge which is where the strings go at the end of the body.
The bridge – The bridge is made up of metal, and is where the guitar strings end.
Tone knob – The tone knob controls the tone of the guitar.
Volume knob – The volume knob controls the volume of the guitar.
Amplifier – An amplifier is what the electric guitar will plug into. This is essentially a speaker. I did a post on the parts of an amplifier and why they are so darn heavy that can be read about right here.
Take a moment to look at the image below in order to familiarize yourself with the electric guitar parts, and their purpose. This is the first step in learning how to play a guitar.
How To Correctly Hold A Guitar
There are a few different styles of holding the guitar. Obviously if you are using a strap you will be standing, but adjust the strap so that it’s easily playable. Find a position that is comfortable for you. A position and length that isn’t too long or too short.
The most common way to hold the guitar while sitting is to place the guitar on your right leg and perpendicular with your body.
Try and keep the guitar from sliding down your leg so you can look at the fretting hand easier. You might be tempted to do this in the beginning.
That typically is a bad practice and a habit we don’t want to pick up. Sit up straight and pull that guitar in close to your body and look over the front of it, if you are needing to focus on your fretting hand.
The Guitar Strings And The Names Of Them
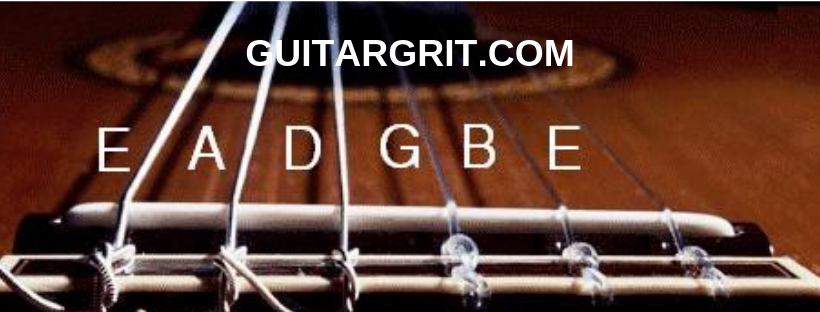
The lowest thickest string of the guitar is an E string. This string can also be called the 6th String.
The next string is called an A string. This string can also be called the 5th string.
The next string is the D string. This string can also be called the 4th string.
The next string is the G string. This string can also be called the 3rd string.
The next string is called the B string. This string can also be called the 2nd string.
The last string is called the high E string. This string can also be called the 1st string.
An easy way to remember the numbers of the strings is just that the lowest string is called the the 6th string. The thinnest string is the 1st string. This string happens to be the high E string.
3 WaysTo Tune Your Guitar
In the video below I will explain how to tune your guitar. I would recommend either using your phone and downloading an app like GuitarTuna.
Or purchasing a cheap tuner that gets attached to the headstock of your guitar. You can see those here.
Lastly, is tuning the guitar on it’s own. This takes some skill and practice.
Learn How To Hold A Guitar Pick
Learning how to hold a guitar pick is simple. With that being said, it can also feel quite awkward at first.
The key to holding the pick is to not allow too much of the pick to be used.
When you use the pick with a lot of the pick it tends to slip out of your hand. I wrote an article on how to hold a pick, that you can check out if this is a problem you have been experiencing.
If the pick is being held too tightly, you can also lose the pick and have it slip on you.
You want to have a nice solid grip, that isn’t too tight and isn’t too loose. Definitely read my article on this if this is an issue, as I have images to show you how it should be held.
Another question you can ask yourself is if the pick seems too flimsy.
If this is the case you are more than likely using a “Thin”, guitar pick. I prefer heavier guitar picks that don’t bend as easily as I feel I have more control with heavier picks.
Obviously this is just my preference. Picks come in thin, medium, and heavy. Be sure to get all 3 different thicknesses.
This will allow you to test them out for yourself, and make your own decision.
You can check out the guitar picks that I recommend trying out here.
Fretting Hand
Now it’s time to discuss the fretting hand. This would be your left hand if you are using a right handed instrument.
Or your right hand if you are using a left handed instrument.
So the frets of the guitar are the metal strips that go vertical across the neck of the guitar. You want to place your finger right in front of the fret, but not on top of the fret.
You also want to curve your finger so that it isn’t touching any other strings as this will cause a muting effect.
If you imagine a line that travels down the middle of the back of the neck that is where you will want your thumb placement to be 95% of the time while playing.
Occasionally people will use the thumb to fret the low E string while playing chords. This is a standard practice for guitarists like Jimi Hendrix. This is an advanced technique though.
So for the time being try and be aware of your thumb placement and try and keep it directly in the middle of the back of the neck. Below is a short video on finger and thumb placement.
How To Read Guitar Tablature
Now that we have gone over the parts of the guitar.
The string names, how to hold a guitar pick, and lastly where to place your fingers and thumb on the fretting hand. I
t’s time to discuss how to read guitar tablature.
This can also be referred to as “guitar tabs”. Guitar tablature looks like this.
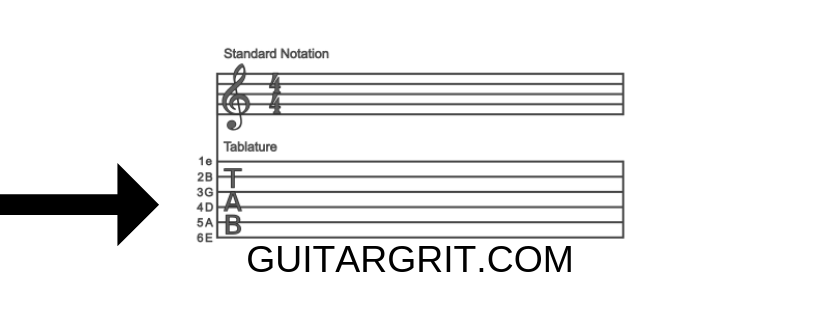
You will see number on the lines of the tablature. This is what fret you will be playing. You will read these numbers from left to right and you will see 2 different styles.
Single notes – Single numbers represent notes. This is usually a melody line or a guitar solo.
If you see stacked notes on top of each other that represents a chord. A chord is multiple notes being strummed at the same time.
Here is an example of what a melody line would look like. Here is how you would play “Happy Birthday”, in what they call the open position.
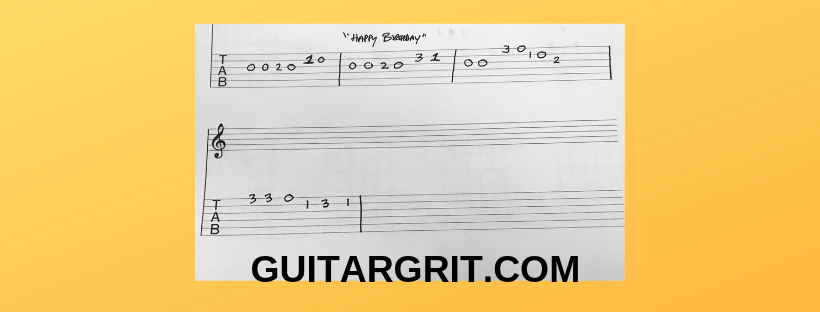
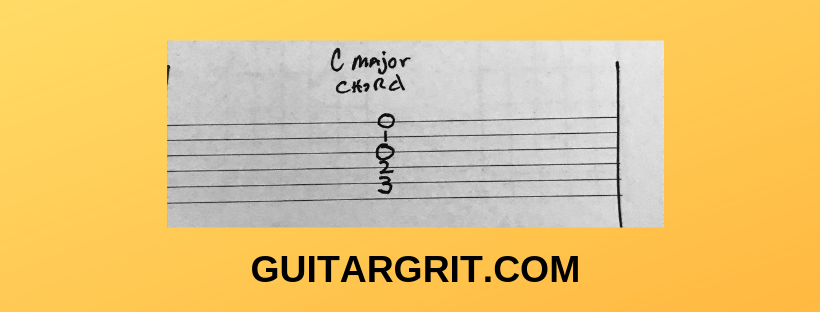
Chords – When the notes are stacked that means that you are playing a chord, rather than a melody. Below is an image to display what that would look like. Below is a C major chord.
Now that we have learned how to read guitar tabs. It’s time to take a look at reading a chord chart. It is more common to see chords on a chord chart vs. on guitar tabs for a few reasons.
The main reason for this is simply so that you can see not only what frets your fingers should be on. Included on a chord chart is what fingers you should be using at what fret.
With just guitar tabs we get the fret numbers but they don’t necessarily show the finger to be used.
This can lead to using the wrong fingerings and making chords literally impossible to play correctly.
How To Read A Chord Chart
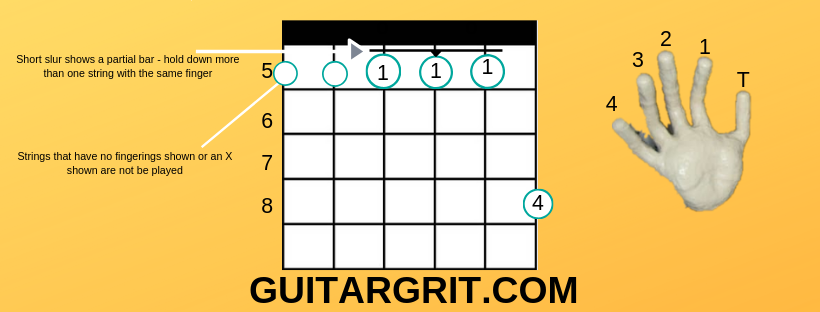
In order to better explain how to read a chord chart. I have attached an image that we will take a closer look at.

First off if we take a look at the weird monster hand. You will see which numbers correlate with which finger to use on the strings.
Secondly, when you see an “O”, above the diagram. This is signaling to play that string open with the rest of the chord.
Third up is the numbers that travel vertically outside of the diagram. These numbers represent the frets, and at which area of the fretboard the fingerings take place.
Fourth, the encircled numbers within the diagram show how the chord is fingered. This also shows exactly which fingers are being used to make the chords.
Lastly, when you see the X. This means to muffle or deaden that string. In other words you don’t want that string to ring out as it’s not a note that is inside the chord being played.
Now let’s take a quick look at a partial bar. A barre chord is when one finger holds down more than one string in order to complete the chord shape.
This slight line connecting fingerings shows which finger to use, and which strings to bar down.
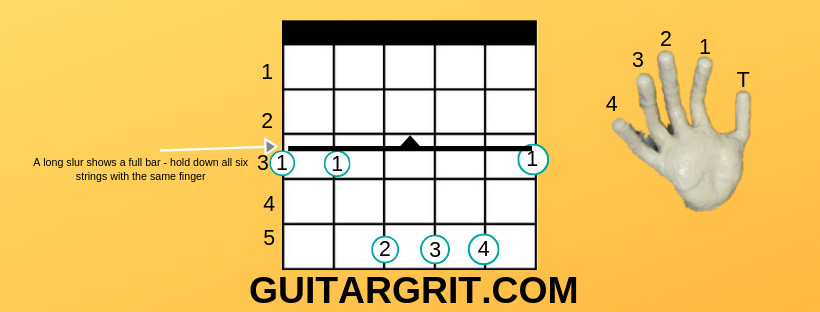
Now let’s take a closer look at what the chord diagram will look like if it is requesting that you place one finger down across all 6 strings.
This is in order to accomplish the chord shape. Take a look at the image below to get an idea of what that looks like.
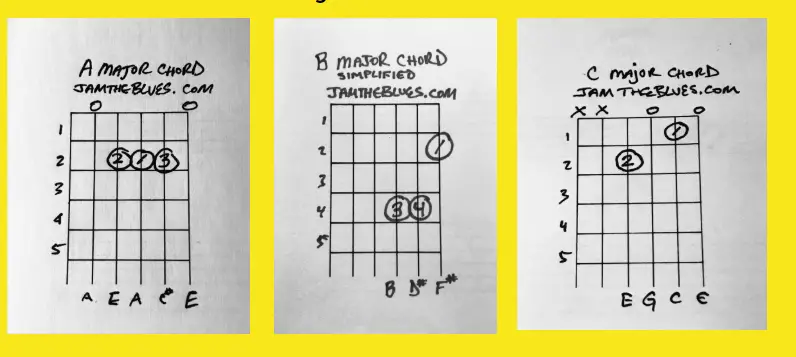
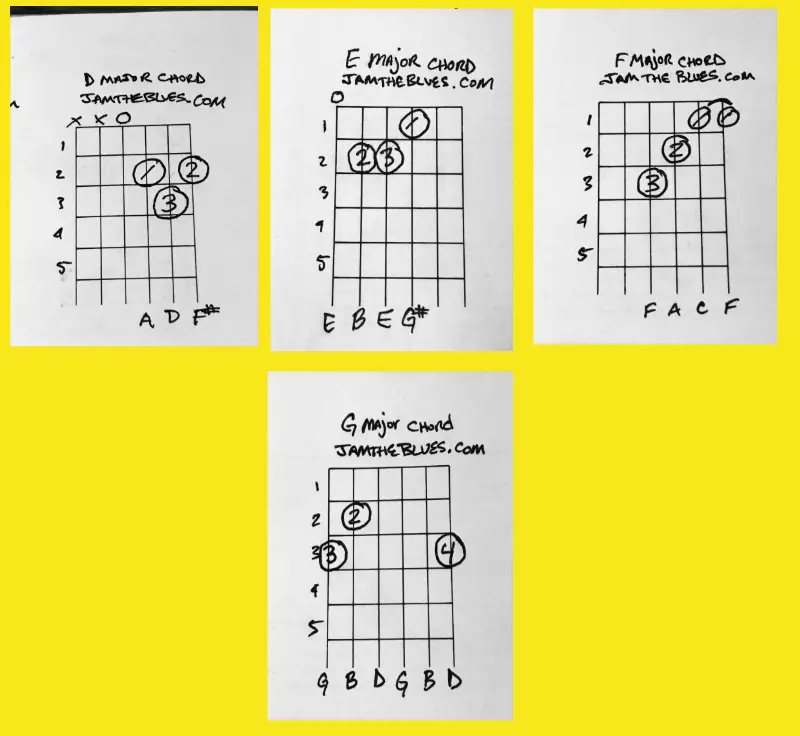
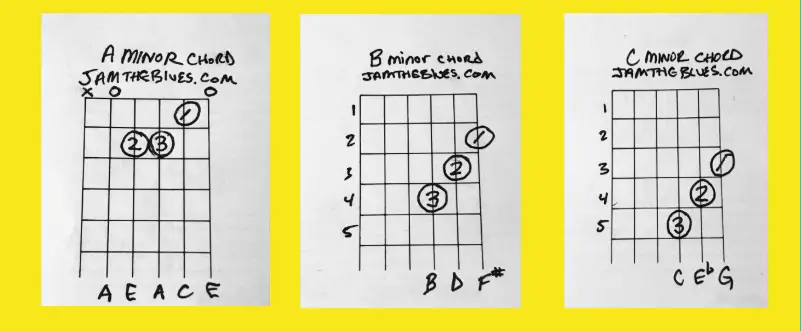
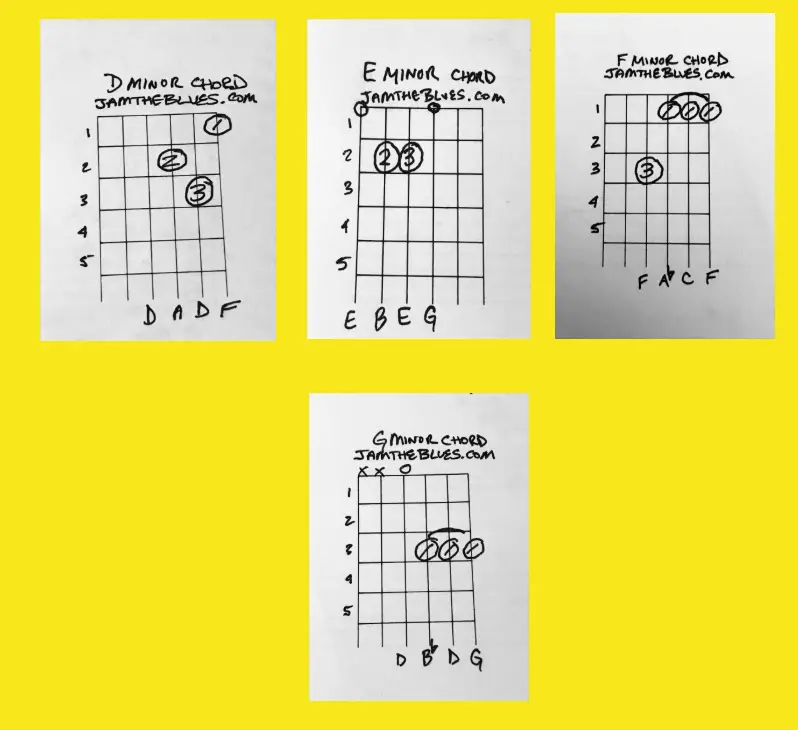
Basic Guitar Chords
Now that we have taken a look at how to read a chord diagram. Let’s take a look at some of the basic guitar chords, that every guitarist should learn. These chords are played in what we call the “open position”.
These chords are used frequently in most songs, so it’s important to learn these fingerings and memorize them. This won’t be quick. This will take time, and dedication.
Although it will take time, with just a few minutes of practice consistently everyday we should be able to get you playing these chords by memory in no time!
Once we have these chords being played by memory we’ll practice switching between chords. More on this later in the “practice routine”, section of this guide.
Below are the chord shapes for the basic guitar chords that you need to learn first and foremost. Feel Free to download this PDF to keep on hand and print out for your practice routine.
Download Basic Chords Here
Basic Major Scale in A
Basic Minor Scale in A
Setting up a Practice Routine, and why you should!
Setting up a practice routine is vital to the success of learning to play the guitar. Often people feel overwhelmed when first starting out.
If this is you, don’t fret! ( No pun intended)… the first thing we need to do is list out what needs to get accomplished every time we sit down to play the guitar.
Just like if you were to go into a gym to lift weights, you’ll be more effective if you go in already knowing which body parts you plan to work on for that day.
I like to set my practice routine up into a few categories so let’s take a closer look at those first.
Practice Routine:
- Warm up exercises
- Chords and changing between them
- Scales and soloing
- Learning songs
I like to break it down like above.
Warm Up Exercises
- It’s vital that we warm up our fingers prior to practicing. Even some simple hand and wrist stretching will help from cramping and feeling the pain that is associated with first starting to play the guitar.
Guitar Warm Up Exercises
Chords and Changing between them
Practicing the Major/Minor Scale
Frequently Asked Questions
Am I too old/young to learn guitar?
Absolutely not! If you can hold a guitar and move your fingers you can learn to play the guitar. I’ve personally taught children as young as 5 and as old as 70. The guitar doesn’t discriminate against age as long as you have a desire to learn.
Is it best to play sitting or standing?
Honestly, this will depend on the style of guitar you are playing. Most though will discover that both is the answer.
If you aren’t strictly a classical player. I would recommend practicing sitting and standing.
The reason for this is because it will be important to feel comfortable in either position.
Is the guitar too big for my child?
If your child is younger than 10 this is very possible. They do make 3/4 sized guitars that your child can use until they are of age that a normal sized guitar does fit them.
You can get a 3/4 guitar here.
How do I keep from accidentally muting the strings?
This is a common problem for beginners. Especially when they are trying to play chords. First thing is to make sure that your nails are short on your fretting hand.
Secondly, what this means is that you aren’t curving your fingers enough and they are muting unwanted strings. Work on curving your fingertips as much as possible.
Lastly, be sure to practice chord changes slower. This will allow you to be extra conscious of finger placement and rolling your fingertips as much as possible.
How to build callus on fingertips?
Practice! This takes a little time. In the beginning your fingers are going to hurt. The callus will help but it will take time to build them up.
Which is the first fret of the guitar?
The first fret of the guitar is the first metal strip that goes vertically down the neck. Check out the parts of the guitar at the beginning of this post to understand this more.
How can I find easy lessons online?
You have a few options here. Option one is the absolute free route of searching on YouTube. There are some great lessons on YouTube for beginner guitarists.
The downside to this is they are usually one off lessons and don’t follow any format. If you want to really learn the guitar online I recommend giving Guitar Tricks a try.
The lessons are amazing and they have full programs to follow so you can track your progress and never be asking yourself what you should be doing next.
You can access a free 14 days of Guitar Tricks right here. (Disclaimer this is an affiliate link. I am a member of Guitar Tricks myself, so I know the value and quality it provides and I am confident in promoting it).
Which guitar should I Buy?
I would recommend deciding first if you are wanting an electric or an acoustic guitar. From there I would do some research online and decide on your budget.
My only recommendation is not buying a guitar for less than a few hundred bucks. I have found that hundred dollar or hundred and fifty dollar guitars don’t stay in tune well.
Tuning a guitar is challenging enough for a beginner. Here are my recommendations for beginners.
How to play guitar without a pick?
Usually this means finger style guitar. Or this could mean just using your thumb to pluck the string rather than using a pick.
If you are looking to play finger style guitar I recommend looking at some beginner classical lessons. Or using a program like Guitar Tricks that teaches, finger style guitar.
What is so great about playing guitar?
The guitar is a very well rounded instrument. You can play solo or with others. I have a full blog post on this here.
Can you recommend a good guitar company that makes inexpensive guitars?
Yes, for electric i prefer Fender, and for an inexpensive but good acoustic guitar I recommend Fender, Gibson, or an Ibanez. I have an Ibanez acoustic that I purchased for about 400 dollars that sounds like a professional 3,000 dollar guitar. You can see my recommendations here.
How long does it take to learn the guitar?
The guitar takes time. The best way to get better faster is through consistency. Set yourself up for success. If you only have 10 minutes a day to dedicate to it. It will take longer than if you have an hour a day to dedicate.
Either way is perfectly acceptable. I recommend keeping a practice log so you can look back after a few months and see how far you’ve come.
I don’t believe you ever stop learning though. So I would say it will take as long as you want it to, and then you must continue to play in order to keep your chops up.
How can I tune a guitar easily?
Definitely look for a free app on your phone. I prefer Guitar Tuna. It’s free and extremely easy to use.Once you have some time under your belt it will get easier and easier to tune it.
How to figure out which chords to use for a song?
This depends.. for example most blues songs follow the same 12 bar pattern. Rock and pop have popular chord progressions as well.
Really this is a matter of understanding a bit more of music theory so you can understand the different keys and how to write songs in different keys.
I really recommend Guitar Tricks again for this. You can also check out my blog posts that goes into more detail on the basic guitar chords,
Is the method the same for a lefty?
Generally speaking yes. They make lefty guitars.
How to attach a strap to a guitar?
Usually the guitar will have 2 spots that a guitar strap will strap on to.
One at the back end of the guitar and one at either the top of the body of the guitar, or possibly on some acoustics it will require you to use a guitar wrap at the head stock.
In Conclusion:
The guitar is an amazing instrument. Not only can you accompany yourself or play with others. This instrument is extremely therapeutic.
One of my favorite things about the guitar is the better you get the more fun it becomes.
It will take patience and practice. It will take time.
If you are willing to put in the work, you will have a lifetime of joy from the guitar.
Whether your intentions are to get as good as Eric Clapton, or simply be able to play some songs around the campfire. Learning guitar is rewarding.
If you have any questions please feel free to reach out and or comment below!
So, are you going to get started learning those guitar chords now? If so which ones do you find the easiest or the hardest to play?
