Have you ever looked at a guitar chord diagram and felt like you were trying to decipher alien hieroglyphics? Don’t worry, you’re not alone! Those little dots and lines can seem more confusing than a Rubik’s Cube covered in math equations. But fear not, dear reader, because we’re here to unravel the mysteries and unlock the secrets of guitar chord diagrams. Get ready to embark on a musical journey filled with twists, turns, and maybe even a few wrong notes along the way. Grab your guitar and let’s dive in!
Contents
- 1 Understanding Guitar Chord Diagram Basics
- 2 The Anatomy of a Guitar Chord Diagram: A Closer Look
- 3 Reading Vertical Lines and Dots: Decoding Finger Placement
- 4 Horizontal Lines and Numbers: Interpreting String and Fret Information
- 5 The Role of “X” and “O”: Muting and Open Strings Explained
- 6 Navigating Barre Chords Through Diagrams
- 7 Advanced Techniques: Interpreting Complex Chord Diagrams
- 8 FAQs
- 9 That’s a Wrap on Guitar Chord Diagrams!
Understanding Guitar Chord Diagram Basics
So you’ve decided to pick up the guitar and learn some chords. Well, buckle up because we’re about to dive into the wonderful world of guitar chord diagrams!
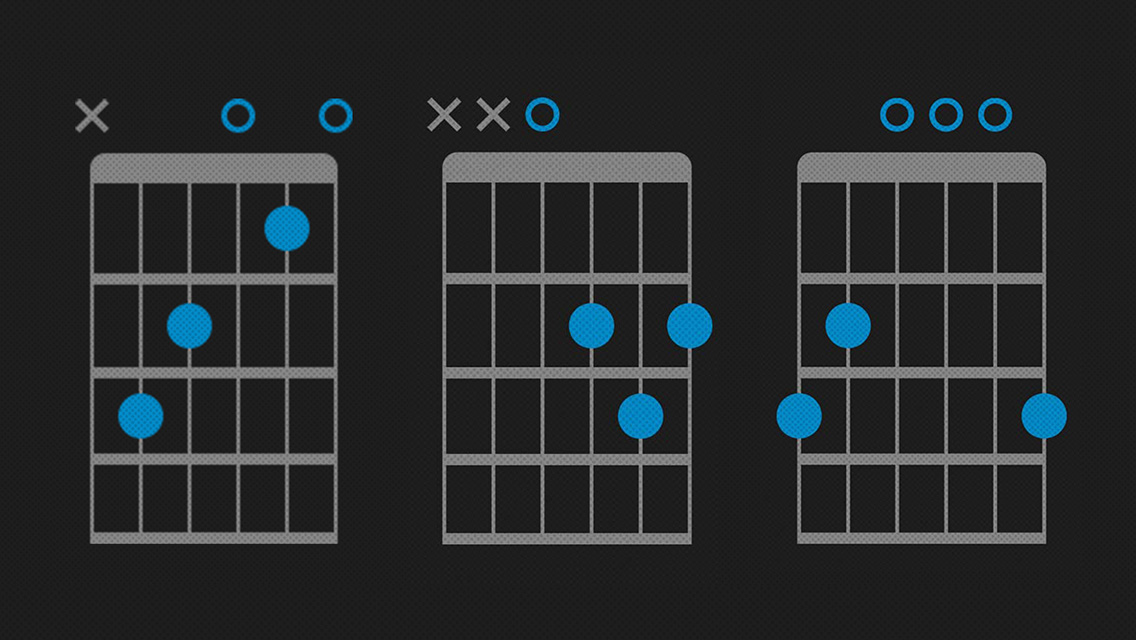
First things first, let’s talk about the basic elements of a chord diagram:
– The vertical lines represent the strings of the guitar, with the thickest string on the left and the thinnest string on the right.
– The horizontal lines represent the frets, with the top line being the nut (where the strings start) and the bottom line being the last fret.
- The dots on the diagram show you where to place your fingers to form the chord.
Now, pay close attention to those numbers on the dots. They tell you which finger to use:
– 1 = index finger
- 2 = middle finger
– 3 = ring finger
– 4 = pinky
Don’t be afraid to get a little creative with your finger placement, as long as you’re not accidentally playing a jazz fusion version of “Mary Had a Little Lamb.” Trust me, no one wants to hear that.
So, grab your guitar, look up some chord diagrams, and start strumming away. Who knows, maybe you’ll be the next guitar virtuoso to take the world by storm! Just remember, practice makes perfect, and a little bit of humor never hurt anyone.
The Anatomy of a Guitar Chord Diagram: A Closer Look
So you’ve got your trusty guitar in hand and you’re ready to rock out. But wait, what’s this strange hieroglyphic on the page in front of you? Fear not, dear guitarist, for I am here to guide you through the mysterious world of guitar chord diagrams.
Let’s start with the basics. At the top of the diagram, you’ll see six vertical lines, each representing a string on your guitar. Remember, the top line is the thinnest string (high E) and the bottom line is the thickest string (low E). If you can’t remember that, just picture a skinny model standing next to a sumo wrestler – easy peasy.
Next, the horizontal lines on the diagram represent the frets on your guitar. Each dot or circle on the diagram represents a finger position on a specific fret. Think of it like playing a game of connect the dots, except instead of creating a beautiful masterpiece, you’re creating beautiful music!
But here’s where things get really interesting. Those mysterious numbers below each horizontal line aren’t lottery numbers – they’re finger numbers! That’s right, your fingers are now playing the role of math geniuses, calculating the precise position to create the perfect chord. Your index finger might be #1, your middle finger #2, and your ring finger #3. Who knew guitar playing was actually a complex mathematical equation?

Reading Vertical Lines and Dots: Decoding Finger Placement
Alright, so you’ve mastered reading horizontal lines and squares with your fingers. Now it’s time to level up and decode those tricky vertical lines and dots! It may seem daunting at first, but fear not, we have the ultimate guide to help you nail finger placement like a pro.
First things first, let’s talk about vertical lines. These sneaky little lines may seem straightforward, but they can be quite confusing if you don’t pay attention. Remember, just like in life, not everything is as it seems! So, when you encounter a vertical line, make sure to position your finger in a way that follows the line from top to bottom. Easy peasy, right?
Now, let’s tackle those dots. They may be small, but they pack a punch when it comes to finger placement. When you see a dot, think of it as a tiny target for your finger. Aim carefully and make sure to hit the bullseye. It’s all about precision and finesse, just like a ninja warrior!
So, the next time you come across a braille text with vertical lines and dots, remember our tips and tricks. Mastering finger placement is like cracking a secret code, and you’re well on your way to becoming a braille decoding ninja. Keep practicing, have fun, and before you know it, you’ll be reading vertical lines and dots like a boss!

Horizontal Lines and Numbers: Interpreting String and Fret Information
So you’ve picked up a guitar and you’re ready to rock out, but what do all those horizontal lines and numbers on the fretboard really mean? Don’t worry, it’s not as confusing as it looks!
Each horizontal line on the fretboard represents a different string on the guitar. From the thickest string (low E) to the thinnest string (high E), you’ve got six strings to work with. Keep in mind that if you see the number 1, that means you’re on the thinnest string, and if you see the number 6, you’re on the thickest string.
When it comes to the numbers on the fretboard, they indicate which fret you should press down on with your fingers. The higher the number, the higher up the neck you go. Just remember, the first fret is right behind the fret closest to the headstock, and each fret after that is higher up the neck.
By combining these horizontal lines and numbers, you’ll be able to play chords, scales, and even solos in no time! Practice makes perfect, so don’t get discouraged if it takes a while to get the hang of it. Before you know it, you’ll be shredding like a pro!

The Role of “X” and “O”: Muting and Open Strings Explained
So you’ve picked up a guitar and you’re ready to rock out like a boss. But wait, what’s the deal with these “X” and “O” symbols on the sheet music? Are we playing tic-tac-toe or making music here?
Let’s break it down for you, my fellow aspiring rockstars. Those “X”s and “O”s are actually indicators of whether you should be muting or playing open strings. Think of it like a secret code to unlocking the mysteries of guitar playing.
When you see an “X” on the sheet music, it’s your cue to be the silent ninja of the guitar world. Mute that string like it’s a noisy neighbor yelling at you to turn down the volume. Use your fingers or palm to gently dampen the string and keep it from making a sound. Just remember, silence is golden, my friends.
On the flip side, when you come across an “O” on the sheet music, it’s time to let those strings sing like they’re in the shower belting out a power ballad. Embrace the open strings and let them ring out with all their glorious sound. It’s your time to shine, so strum those strings like you’re playing to a stadium full of adoring fans.
So you’ve entered the wonderful world of barre chords and you’re feeling a little lost? Fear not, we’re here to guide you through the maze of diagrams with ease!
First things first, let’s break down the basics. Barre chords are like the broccoli of the guitar world – essential, but can be a bit tricky to swallow at first. The good news is, once you get the hang of them, a whole new world of musical possibilities will open up to you.
Now, imagine these diagrams as treasure maps, leading you to the hidden gems of guitar mastery. Each line represents a string, and each number tells you which fret to press down. It’s like solving a musical puzzle, but way more fun (and less frustrating).
Here’s a pro tip for you – practice, practice, practice! The more you work with these diagrams, the easier they’ll become to read and play. And remember, even the greatest guitarists were once beginners too. So keep at it, and soon enough you’ll be slaying those barre chords like a rockstar!
Advanced Techniques: Interpreting Complex Chord Diagrams
So you’ve mastered the basics of chord diagrams and are ready to tackle the more complex ones? Congratulations, you brave soul! Here are some advanced techniques to help you decode those intricate chord diagrams like a pro:
1. **Study the anatomy**: Just like dissecting a frog in biology class, dissecting a complex chord diagram requires patience and attention to detail. Identify each component of the diagram – the dots representing the finger placements, the lines denoting the strings, and any additional symbols like bars or circles. It’s like solving a musical puzzle!
2. **Look for patterns**: Complex chord diagrams may seem intimidating at first, but don’t fret (pun intended)! Look for patterns and similarities between different chords. You might notice that certain fingerings or shapes are repeated across different chords, making it easier to memorize and play them.
3. **Experiment with alternate fingerings**: Sometimes, the suggested finger placements on a complex chord diagram may not work for you. Don’t be afraid to experiment with alternate fingerings to find a more comfortable and efficient way to play the chord. Remember, there’s no right or wrong way to play a chord as long as it sounds good!
FAQs
Why do guitar chord diagrams look like alien hieroglyphics?
It’s not Morse code or a message from outer space, I promise! Guitar chord diagrams are simply visual representations of where you need to place your fingers on the fretboard to play a specific chord. Once you crack the code, you’ll be shredding like a rockstar in no time.
How do I read guitar chord diagrams?
Think of guitar chord diagrams as maps for your fingers. The vertical lines represent the strings on the guitar, while the horizontal lines represent the frets. The circles or dots on the diagram show you where to place your fingers to create the chord. It’s like connect the dots, but way cooler.
Why are some guitar chord diagrams labeled with strange symbols like “X” or “O”?
Those mysterious symbols aren’t secret codes – they’re just shorthand for telling you whether to play a string or not. “X” means you should mute or not play that string, while “O” means the string should be played open (i.e., not fretted). It’s like learning a new language, but with more strumming.
What’s the best way to practice using guitar chord diagrams?
Practice makes perfect, so start slow and steady. Choose a few simple chords to work on, like G, C, and D, and practice transitioning between them smoothly. Use the diagrams as your guide, and before you know it, you’ll be playing your favorite songs with ease. Rock on!
That’s a Wrap on Guitar Chord Diagrams!
And there you have it, folks! The secret to deciphering those cryptic little grids on your music sheets. No longer will you be left scratching your head and strumming aimlessly. Armed with this newfound knowledge, you’ll be picking and strumming like a pro in no time. So go forth, young guitarist, and conquer those chord diagrams with confidence and flair. Rock on!


