
Are you tired of playing what should be a beautiful melody only to have it come across as a jumbled mess of notes? Has your guitar playing left your audience more puzzled than impressed? Fear not, dear musically challenged friends, for the key to enhancing your chord clarity lies in one simple solution: correct finger placement. So put down that air guitar and get ready to rock your world with some fingerpicking perfection!
Contents
- 1 Understanding the Fundamentals of Finger Placement for Chord Clarity
- 2 Exploring the Role of Hand Position in Achieving Clean Chord Transitions
- 3 Strategies for Minimizing Finger Fatigue and Maximizing Performance
- 4 Techniques for Correcting Common Finger Placement Mistakes
- 5 Enhancing Muscle Memory Through Targeted Practice Exercises
- 6 Adapting Finger Placement for Different Guitar Types and Playing Styles
- 7 Monitoring Progress and Fine-Tuning Finger Placement for Optimal Clarity
- 8 FAQs
- 9 In Conclusion: Rock On with Perfect Chords!
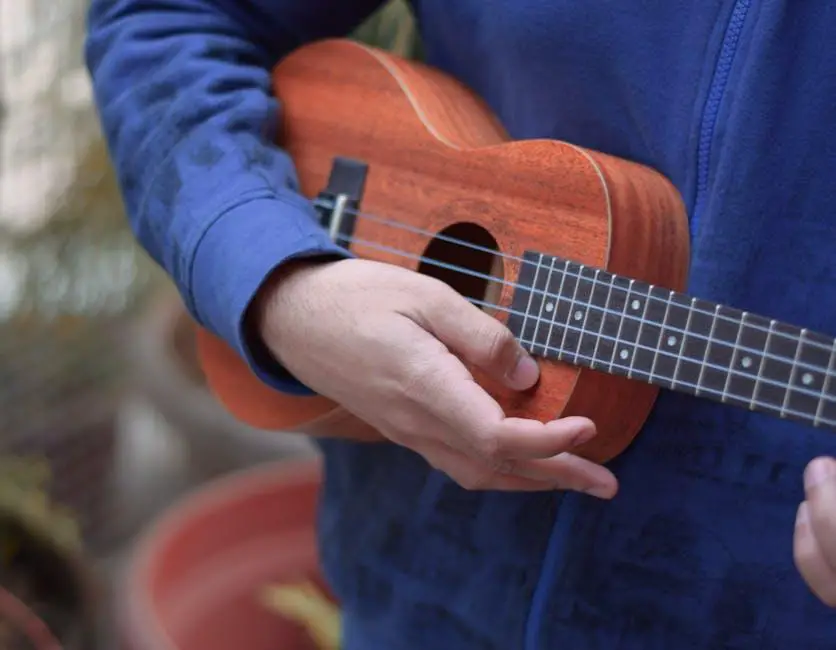
Understanding the Fundamentals of Finger Placement for Chord Clarity
When it comes to playing chords on the guitar, finger placement is key for achieving clarity and ensuring your audience doesn’t think you’re just strumming random strings. Here are some fundamentals to keep in mind:
First and foremost, make sure your fingers are pressing down on the correct strings and frets. It may seem obvious, but you’d be surprised how easy it is to accidentally mute a string or play a note out of tune. Trust me, that sour sound will have your listeners cringing faster than you can say “Oops, wrong chord!”
Next, pay attention to the positioning of your fingers. **Keep them close to the frets** to minimize buzzing and ensure a clean sound. Pretend the fretboard is a crowded subway train – the closer together, the better!
Lastly, don’t forget to use the right amount of pressure. **Press down firmly, but don’t crush your poor little fingers**. Finding that sweet spot where the notes ring out clearly without causing you physical pain is an art form in itself. But hey, practice makes perfect, right?

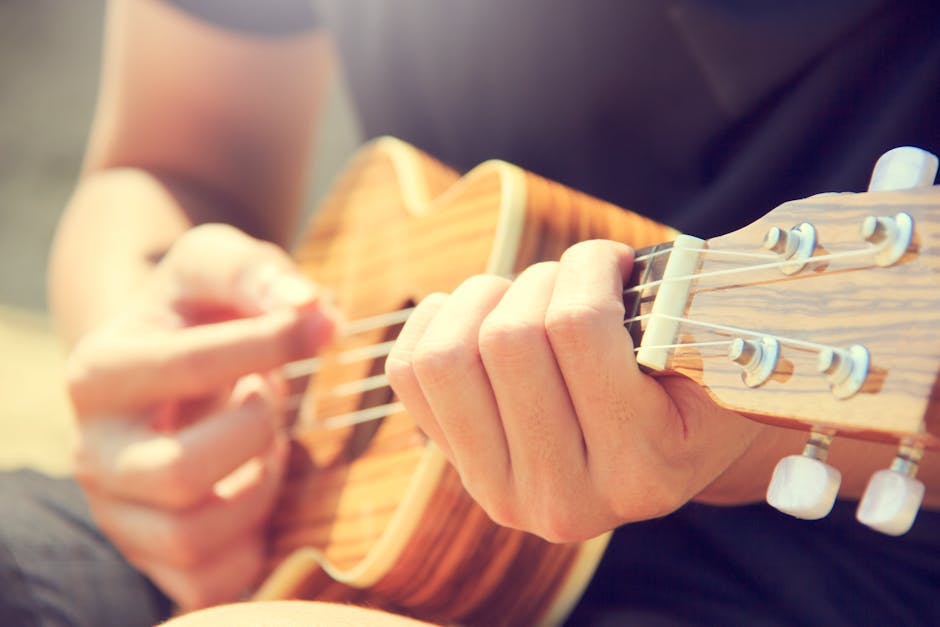
Exploring the Role of Hand Position in Achieving Clean Chord Transitions
Have you ever wondered why your chord transitions sound more like a jumbled mess rather than a smooth musical progression? Well, the key to mastering clean chord transitions may just lie in the position of your hands!
When it comes to playing chords on the guitar, hand position is crucial. Incorrect placement can result in muted strings, buzzing notes, and a general lack of clarity in your playing. So, how can you ensure your hand position is on point? Here are a few tips:
- Finger Placement: Make sure each finger is placed directly behind the fret it is meant to press down on. Avoid letting your fingers creep towards the next fret, as this can cause accidental muting of neighboring strings.
- Thumb Placement: Your thumb should be positioned comfortably behind the neck of the guitar to provide support and stability. Avoid letting it peek over the top of the neck or wrap around it, as this can hinder your finger movement.
- Wrist Alignment: Keep your wrist straight and in line with your forearm to allow for a natural hand position. Avoid bending your wrist too much or angling it unnaturally, as this can lead to tension and strain in your hand.
By paying attention to your hand position and making small adjustments as needed, you’ll find that your chord transitions become cleaner, smoother, and more musical. So, next time you pick up your guitar, take a moment to check your hand position and see the difference it can make in your playing!
Strategies for Minimizing Finger Fatigue and Maximizing Performance
Hey there, fellow gamers! Are your fingers feeling the burn after hours of intense gaming sessions? Fear not, for we have some epic strategies to help minimize finger fatigue and maximize your performance!
First up, make sure to take frequent breaks to give your fingers a chance to rest and recover. We know it’s hard to tear yourself away from that epic quest or intense battle, but trust us, your fingers will thank you later. Take a moment to stretch and relax those digits before diving back into the action.
Next, invest in a high-quality ergonomic gaming mouse and keyboard. These bad boys are designed to reduce strain on your hands and fingers, allowing you to game for longer periods without discomfort. Trust us, once you go ergonomic, you’ll never go back!
Another great tip is to practice proper hand positioning while gaming. Make sure to keep your wrists straight and avoid hovering over the keys or mouse for prolonged periods. And don’t forget to adjust the sensitivity settings on your mouse to ensure smooth and precise movements. Your fingers will thank you for it!

Techniques for Correcting Common Finger Placement Mistakes
Alright, so you’re tired of inadvertently creating a symphony of off-key notes because your fingers just won’t behave themselves on the fretboard. Fear not, dear guitarist - we’ve got some tips to help you correct those pesky finger placement mistakes.
First things first, let’s address the infamous flying pinky. This rebellious digit has a mind of its own, often wandering off to destinations unknown instead of pressing down on that crucial string. To combat this, try **keeping your thumb anchored** on the back of the neck for extra support and bring that pinky back in line. Remember, teamwork makes the dream work!
Next up, the dreaded cramping ring finger. This poor guy always seems to get stuck in the wrong position, causing major chords to sound more like a sad trombone. To remedy this, make sure **your wrist is in a neutral position**, allowing your fingers to move freely without feeling cramped. And hey, a quick stretch break never hurt anyone - give those fingers a little wiggle to loosen them up!
Lastly, we have the elusive thumb peeking over the top of the neck like a mischievous peek-a-boo player. While it may seem clever, this sneaky move actually limits your reach and control. Keep that thumb planted firmly on the back of the neck and watch your finger placement improve dramatically. Remember, a happy thumb makes for happy fingers!

Enhancing Muscle Memory Through Targeted Practice Exercises
Are you tired of feeling like a clumsy baby giraffe when trying to perform certain tasks? Well, fear not! By incorporating targeted practice exercises into your routine, you can enhance your muscle memory and become a pro in no time.
Picture this: you’re trying to juggle oranges, but you keep dropping them everywhere. Instead of giving up and resorting to eating mushy oranges off the floor, why not try some specific exercises to improve your hand-eye coordination? Try these fun exercises to enhance your muscle memory:
- Practice juggling with scarves first, then move on to the oranges.
- Play catch with a friend using a small rubber ball to improve your reflexes.
- Try finger dexterity exercises like finger taps or typing drills on a keyboard.
Don’t be discouraged if you don’t see immediate results – Rome wasn’t built in a day, and neither will your muscle memory be. Keep practicing consistently, and soon enough, you’ll be juggling oranges like a Cirque du Soleil performer.
Remember, the key to enhancing muscle memory is targeted practice. So whether you’re trying to perfect your golf swing, learn a new dance routine, or simply improve your coordination, incorporating specific exercises into your routine can make all the difference. So, what are you waiting for? Get out there and start practicing – your muscles will thank you!
Adapting Finger Placement for Different Guitar Types and Playing Styles
When it comes to playing guitar, the saying “different strokes for different folks” couldn’t be more true. The same goes for finger placement! Depending on the type of guitar you’re playing and your desired playing style, you may need to adapt your finger placement for optimal performance.
For those shredding on an electric guitar, **having nimble fingers is key**. **Positioning your fingers closer to the fretboard** will allow for faster and more precise playing. This is especially important for intricate solos and fast-paced riffs. Additionally, **using a lighter touch** on the strings can help prevent unnecessary buzzing and maintain a clean sound.
On the other hand, acoustic guitars require a bit more finesse in finger placement. **Positioning your fingers further away from the fretboard** can help produce a fuller, more resonant sound. This is particularly useful for fingerstyle playing and picking patterns. **Applying more pressure** to the strings can also help amplify the sound of an acoustic guitar, giving it that rich, warm tone.
Regardless of the type of guitar you’re playing or your preferred style, **experimenting with different finger placements** can help you find what works best for you. Whether you’re strumming chords, picking melodies, or shredding solos, finding the right finger placement can make all the difference in your playing. So go ahead, get creative, and see how adapting your finger placement can take your guitar skills to the next level!
Monitoring Progress and Fine-Tuning Finger Placement for Optimal Clarity
As you continue to practice and refine your technique, it’s important to monitor your progress and make any necessary adjustments to ensure optimal clarity in your playing. One way to do this is by regularly recording yourself and listening back to identify areas for improvement.
Additionally, pay attention to how your fingers are positioned on the keys. Are you consistently hitting the right notes with precision? Fine-tuning your finger placement can make a world of difference in the sound you produce.
Remember, practice makes perfect, but it’s also helpful to incorporate some fun exercises into your routine. Try playing scales or arpeggios in different rhythms to challenge yourself and keep things interesting.
Lastly, don’t be afraid to seek feedback from a teacher or mentor. They can provide valuable insight and guidance to help you continue progressing towards your musical goals. Keep up the hard work and dedication, and soon enough, you’ll be playing with the clarity and precision of a pro!
FAQs
Why is finger placement important for chord clarity?
Finger placement is crucial for chord clarity because using the correct fingers on the correct frets ensures that each note in the chord rings out clearly without any interference from neighboring strings. It’s like having a well-organized party where each guest has their designated spot so everyone can have a good time without bumping into each other.
How can I improve my finger placement for chords?
Practice, practice, practice! Just like learning how to juggle or ride a unicycle, it takes time and dedication to train your fingers to hit the right spots on the guitar neck. Start by focusing on each chord individually and make sure your fingers are positioned correctly before strumming. Think of it like a game of musical Twister!
What are some common mistakes to avoid when it comes to finger placement?
One common mistake is having fingers accidentally mute other strings when forming a chord. This can be avoided by ensuring that your fingers are arched and placed on the tips, rather than flat across the strings. It’s all about giving each string its own personal space, like a well-mannered group of friends at a dinner party.
Are there any exercises I can do to improve my finger placement?
Yes, there are plenty of exercises you can do to improve your finger placement! One fun exercise is to practice forming and switching between chords slowly and deliberately, making sure each note rings out clearly. It’s like doing yoga for your fingers, helping them become more flexible and agile on the guitar neck.
In Conclusion: Rock On with Perfect Chords!
So there you have it, folks! By mastering the art of correct finger placement, you can elevate your guitar playing to a whole new level. Say goodbye to muffled chords and hello to crystal-clear sound! Keep practising, keep rocking, and soon enough you’ll be playing like a true guitar virtuoso. Until next time, keep those fingers on point and keep strumming those chords like a pro!
