

Have you ever looked at a guitar chord diagram and felt like you were trying to decipher an ancient hieroglyph? Fear not, fellow music enthusiasts! Unveiling the mystery of guitar chord diagrams doesn’t have to be as hard as finding the last piece of a puzzle under the couch. With a few effective learning strategies up your sleeve, you’ll be strumming away like a rock star in no time. So grab your guitar, buckle up, and prepare to unlock the secrets of those enigmatic chord diagrams!
Contents
- 1 Understanding the Basics of Guitar Chord Diagrams
- 2 Deciphering Symbols and Lines in Chord Charts
- 3 Mastering Chord Shapes: A Step-by-Step Guide
- 4 Navigating Complex Chords with Ease
- 5 Applying Learning Strategies for Quick Mastery
- 6 Overcoming Common Challenges in Reading Chord Diagrams
- 7 Expanding Your Musicianship with Advanced Chord Diagram Techniques
- 8 FAQs
- 9 Strumming Off into the Sunset
Understanding the Basics of Guitar Chord Diagrams
So, you’ve picked up a guitar and have no idea where to start with those funky chord diagrams staring back at you. Fear not, my friend, for I am here to guide you through the wacky world of guitar chords with all the finesse of a rockstar on stage.
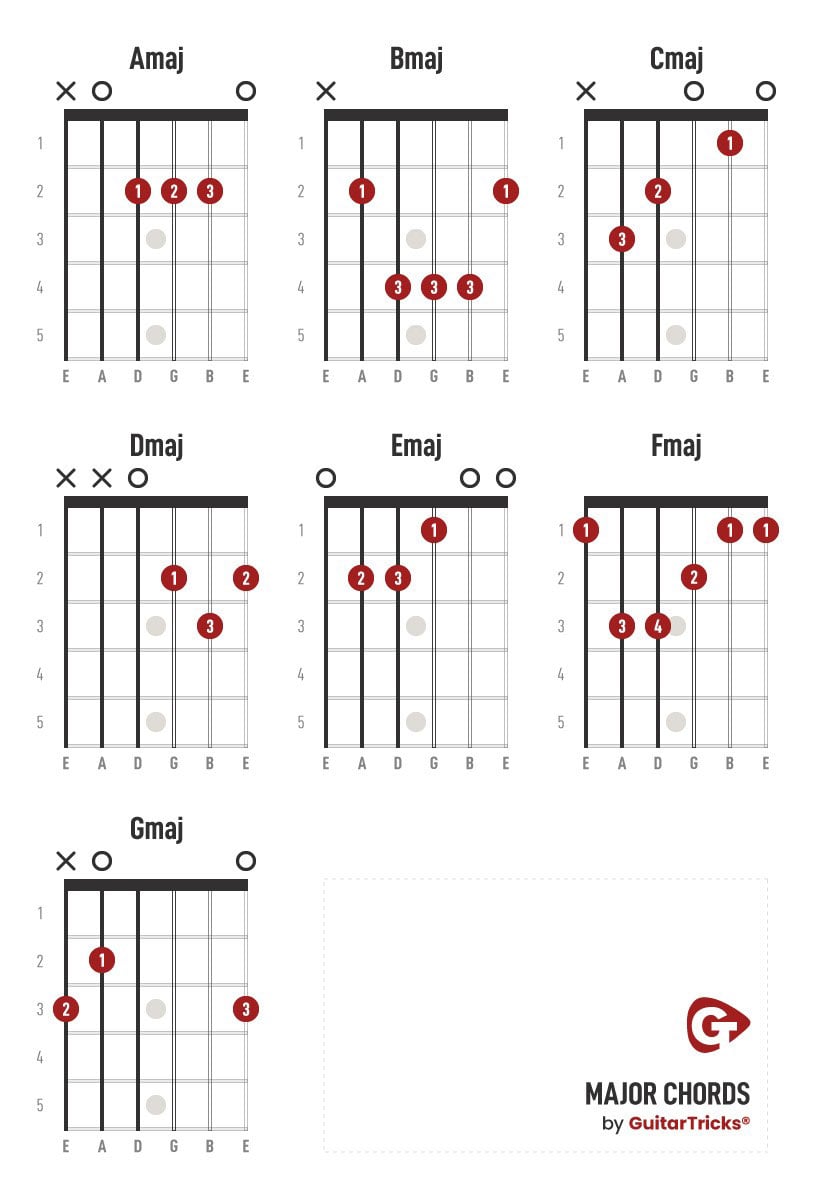
First off, let’s break down those mysterious diagrams. Each diagram represents the neck of the guitar, with the vertical lines representing the strings and the horizontal lines representing the frets. Sounds confusing? Don’t worry, it’s easier than deciphering hieroglyphics.
Now, onto the actual chords themselves. Those weird dots and numbers on the diagram actually represent which fingers you need to place on which strings and frets. It’s like a secret code, but instead of unlocking treasure, you’re unlocking the power of music. Pretty cool, right?
And remember, practice makes perfect. Don’t get discouraged if you can’t nail that D major chord on the first try. Keep at it, and soon enough you’ll be strumming away like a seasoned pro. So, grab your guitar, decode those diagrams, and get ready to rock the house down!
Deciphering Symbols and Lines in Chord Charts
Have you ever looked at a chord chart and felt like you were trying to crack a secret code? Well, you’re not alone! can sometimes feel like trying to read hieroglyphics. But fear not, brave musicians! We are here to guide you through the treacherous waters of chord chart confusion.
First things first, let’s tackle those mysterious symbols. From standard chords like C, D, and G to more complex ones like Bb7 and F#m, it can feel like you’re trying to navigate a musical minefield. But fear not, my fellow musicians! Here’s a quick cheat sheet to help you decode those pesky symbols:
- M = Major chord
- m = Minor chord
- 7 = Dominant 7th chord
Now onto the lines. Ah, the lines. Sometimes straight, sometimes curved, they can be as confusing as a maze in a dark cave. But fret not! Here’s a quick guide to help you navigate these musical mazes:
- Straight lines = Play the chord for the duration of the line
- Curved lines = Arpeggiate the chord or strum a pattern

Mastering Chord Shapes: A Step-by-Step Guide
So, you’ve decided to take on the challenge of mastering chord shapes. Good for you! Now, grab your guitar and get ready for a wild ride through the world of musical finger acrobatics.
First things first, let’s talk about the basic open chords. These bad boys will be the foundation of your chord shape empire. Practice them until your fingers bleed (okay, maybe not that extreme, but you get the point).
- Start with the classic G major chord. It’s like the cool kid at the party – everyone loves it.
- Next up, tackle the C major chord. It’s a bit more complex, but you’ve got this!
- Don’t forget about the D major chord. It’s like the trusty sidekick to G and C.
Once you’ve got those open chords down pat, it’s time to move on to barre chords. These bad boys are not for the faint of heart. Get ready to feel the burn in your wrist and forearm as you wrestle with these finger-twisting shapes.
So you’ve found yourself in the deep, dark depths of complex chords – never fear, my fellow musician! With a little determination and a touch of magic, you’ll be navigating these treacherous waters with ease in no time.
First things first, let’s talk about inversions. No, we’re not talking about alien abductions here, we’re talking about flipping those chords upside down and inside out. Think of it as a fun little game of musical Tetris. Pro tip: Get cozy with these inversions and you’ll be sliding up and down the keyboard like a seasoned pro.
Next on our list of conquering complex chords is voicing. No, not the voices in your head telling you to give up – we’re talking about how you choose to arrange those spicy chords. Mix it up, experiment, and before you know it, you’ll be serenading your audience with sounds they never knew they needed.
And finally, don’t forget to play around with extensions. No, not hair extensions – we’re talking about adding a little extra flair to those chords. Throw in a sharp 11 or a flat 13 and watch as your audience’s jaws drop in awe. Remember: The more complex, the more impressive. So go on, embrace the complexity and let your fingers dance across the keys like never before.

Applying Learning Strategies for Quick Mastery
So you want to become a master in no time? Well, lucky for you, there are some learning strategies you can apply to speed up the process. Here’s how you can make learning faster and easier:
- Break it down: Don’t try to tackle everything at once. Break down the material into smaller, more manageable chunks. This way, you can focus on one thing at a time and avoid feeling overwhelmed.
- Practice, practice, practice: The key to mastery is practice. The more you practice, the better you’ll get. So make sure to set aside time each day to work on your skills.
- Get creative: Don’t be afraid to get creative with your learning. Try different methods, such as flashcards, diagrams, or mnemonic devices, to help you remember the information better.
Remember, becoming a master takes time and patience. So don’t get discouraged if you don’t see immediate results. Keep practicing and applying these learning strategies, and you’ll be on your way to quick mastery in no time!
Overcoming Common Challenges in Reading Chord Diagrams
So, you’ve finally decided to tackle the world of chord diagrams and become a master guitarist. Congratulations! But let’s face it, reading those little shapes on the page can be as frustrating as trying to untangle a slinky.
But fear not, fellow guitar hero! With a little patience and perseverance, you can overcome these common challenges and strum your way to success.
First things first, make sure you’re holding your guitar the right way up. Yes, believe it or not, some people have tried to play upside down! So before you get too frustrated with those pesky diagrams, double check that your guitar is right side up.
Next, take a deep breath and remember that even the greatest guitarists in the world once struggled with chord diagrams. It’s all part of the learning process. So grab a cup of coffee, put on your favorite guitar playlist, and tackle those diagrams with a can-do attitude.
Expanding Your Musicianship with Advanced Chord Diagram Techniques
So you’ve mastered the basics of chord diagrams and are ready to take your musicianship to the next level. Well, you’ve come to the right place! With advanced chord diagram techniques, you can expand your musical horizons and wow your audience with your newfound skills.
One technique to try is experimenting with different chord voicings. By changing the order of the notes within a chord, you can create unique and interesting sounds that will set your music apart from the rest. Play around with inversions, added tones, and suspended chords to add some flair to your playing.
Another fun technique to explore is using chord extensions. By adding extra notes to your chords, you can create rich and complex harmonies that will elevate your music to new heights. Try adding ninths, elevenths, and thirteenths to your chords for a lush and sophisticated sound.
Lastly, don’t be afraid to experiment with unconventional chord shapes. Break free from the traditional shapes and explore new ways to play chords on the fretboard. Who says you have to stick to the boring old barre chords? Get creative and find new, exciting ways to express yourself through your music.
FAQs
Why do guitar chord diagrams look like a foreign language?
It’s like trying to decipher hieroglyphics, right? Well, fear not! Once you crack the code, you’ll be strumming away like a rock star in no time.
How can I make sense of all those lines and dots on a guitar chord diagram?
Think of it as your own personal treasure map to musical greatness. Each line represents a guitar string, and each dot tells you where to place your fingers. It’s like a game of connect-the-dots, but with a much more rockin’ soundtrack.
What are some effective strategies for learning guitar chord diagrams?
Practice, practice, practice! Repetition is key when it comes to mastering those tricky chord shapes. And don’t be afraid to break it down into smaller chunks – Rome wasn’t built in a day, and neither was Jimi Hendrix’s guitar playing.
Are there any shortcuts or hacks for understanding guitar chord diagrams?
Well, they say a picture is worth a thousand words, so why not take advantage of visual aids? YouTube tutorials, chord diagram posters, or even apps can be incredibly helpful in demystifying those complex chord shapes.
How can I stay motivated while learning guitar chord diagrams?
Reward yourself with a mini concert for your pet goldfish every time you successfully nail a new chord. Who knows, maybe Fluffy has a hidden talent for critiquing musical performances!
Strumming Off into the Sunset
Thanks for tuning in to uncover the secrets of guitar chord diagrams! From deciphering those mysterious squiggles to mastering the art of strumming, we hope our guide has struck the right chord with you. Remember, practice makes perfect – so keep on plucking those strings and soon enough, you’ll be rocking out like a pro. And just like learning a new riff, don’t be afraid to hit a few wrong notes along the way. After all, as they say, every master was once a disaster! So grab your guitar, unleash your inner rockstar, and let the music take you on a wild ride. Until next time, keep strumming and keep shining bright like a diamond in the rough!
